HTPC setup
This is a guide to setting up a Windows 10/11 computer as a computer for watching videos and playing games on your home theater system. It’s also a good guide to follow if you’re building a machine that will be placed inside of an arcade cabinet.
You’ll need a computer with the following specifications:
- Windows 10 Pro or 11
- At least 8GB of RAM
- At least 256GB of main storage
- An HDMI port that supports audio
- Bluetooth
Additional hardware:
- XBox One controllers with Bluetooth support. (If it pairs with your phone it will work for this. )
- A remote control.
- HP Windows Media Center remote works very well: https://www.ebay.com/itm/263403349021
- Alternatively, the USB-UIRT receiver works well.
- This USB Bluetooth remote is another good choice and it requires no configuration, but is very limited in advanced functionality.
You’ll set up the following pieces of software:
| Software | Purpose |
|---|---|
| 7zip | Decompress 7z archives. |
| TightVNC | Lets you see and contorl the remote machine’s desktop. |
| J.River Media Center | Play movies, videos, and music files. |
| ES-DE | A front end for games. |
| RetroArch | Emulators and control system for various retro gaming systems. |
| Steam | Store and library for PC games. |
| Bezel Project Windows Utility | A program to fetch bezels for your games. |
| Flex | A front-end launcher designed for home theater machines. |
| EventGhost | A program to control your PC with a remote. |
Important Notes
You’re going to make tons of security compromises here. In order to have a decent experience and reduce complexity, you’re going to do everything from single administrator account.
You’re only going to use Windows Defender.
You’re going to enable file sharing and remote access so you can manage files and configuration from another machine for convenience in case something goes wrong with the TV.
So be sure to properly secure the hardware, and make sure you don’t leave any external network access holes. Treat this like a Nest cam, or an unsupported IoT device you bought off of eBay.
You can secure it more if you know how, but you’re on your own.
Set up directories
You’ll create directories in the root of the hard drive, rather than in your home directory. This will make it easier to access these files from multiple accounts and external shares. There are special permissions applied to the Home directories that are difficult to deal with when mapping drives, so creating these directories in the root will reduce issues when you’re trying to transfer files or remotely edit configuration files.
- Create the folder
c:\htpc. This is where you’ll store the front-end and configuration files. - Create the folder
c:\games. This is where you’ll place games. - Create the folder
c:\pictures. This is where you’ll store pictures for your screen saver. - Create the folder
c:\music. This is where you’ll place MP3 files.
Once you’ve created the directories, you’ll download some additional utilities.
Get some tools.
First, download and install Google Chrome:
Next, download 7Zip.
- Download it from https://www.7-zip.org/
- Install it and open the 7zip program.
- Go to Tools and select Options.
Ensure 7Zip is associated with 7z files:
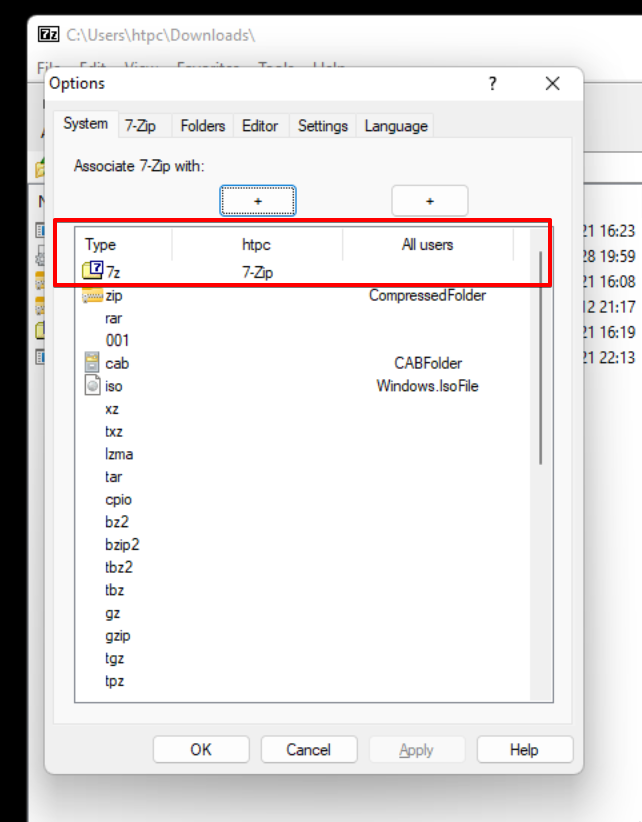
Close 7Zip.
Next you’ll clean out some of the pre installed programs and background processes.
Remove cruft and Speed Up the UI
There are a lot of tools Windows installs for you and they’re not easy to remove.
You’ll download and execute a script that will debloat your machine. Review the script first before proceeding:
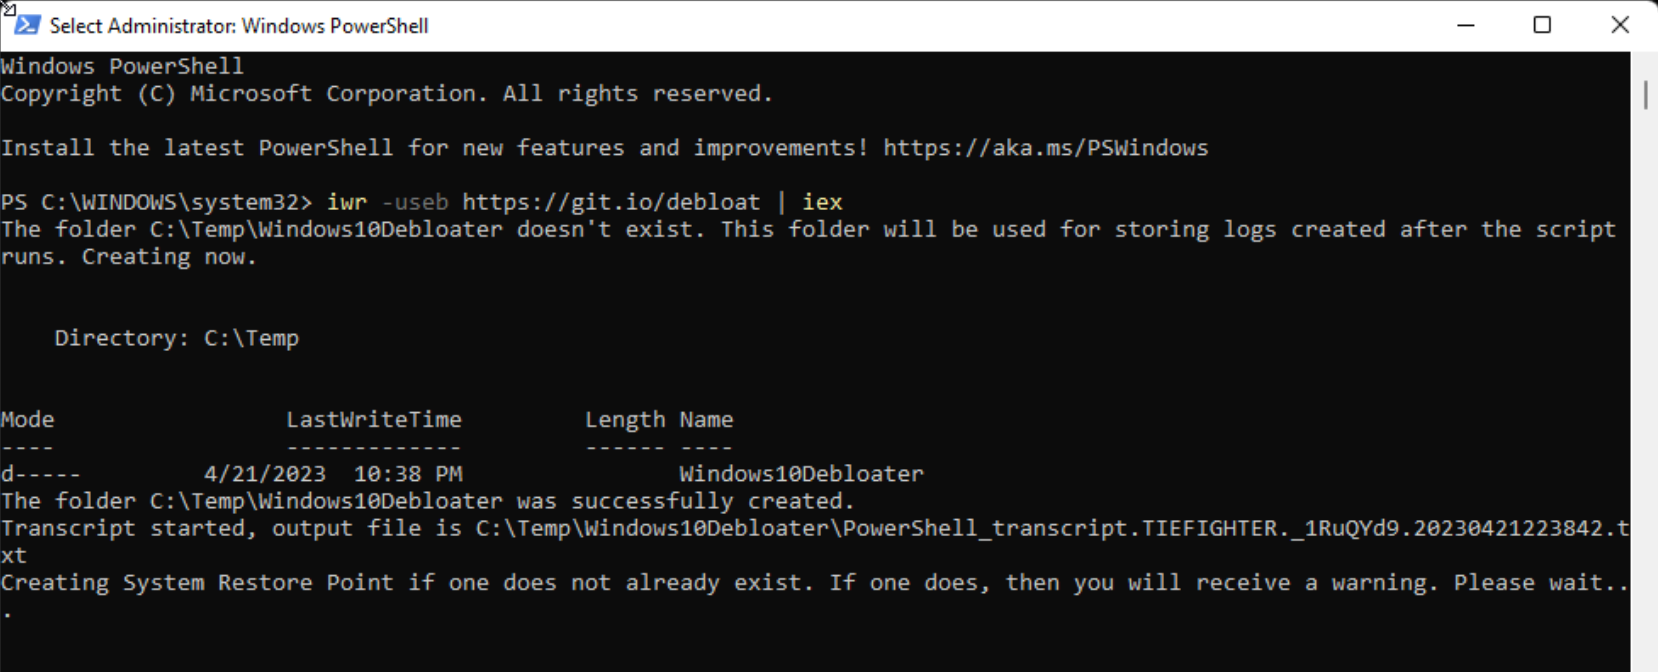
Open a PowerSHell with Admin access and run the following command:
iwr -useb https://git.io/debloat|iex
The script will create a restore point:
You’ll then be presented with a user interface that lets you remove programs and features:
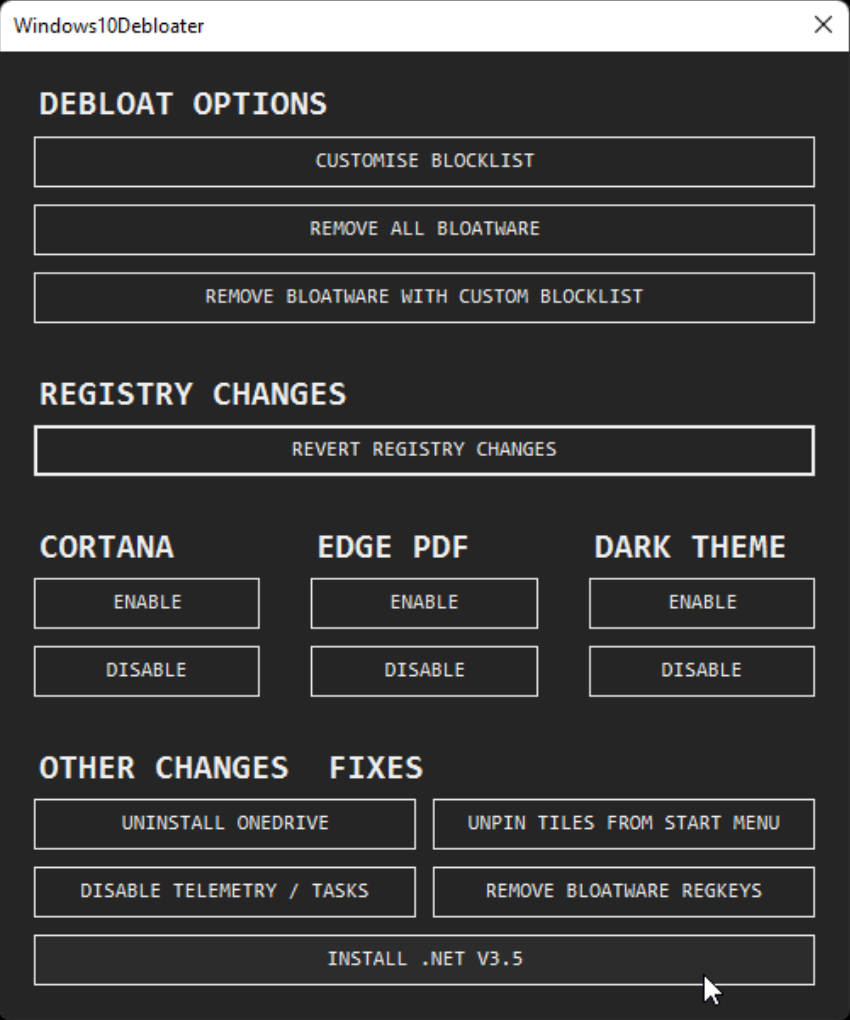
Choose the following options:
- Disable Cortana
- Disable Edge PDF
- Uninstall Onedrive
- Disable Telemetry / Tasks
The default blocklist is very aggressive. It will remove Notepad, Xbox-related things, and even the Windows Store. So close the script. You’ll remove components by hand.
3d Builder
Get-AppxPackage *3dbuilder* | Remove-AppxPackage_Alarms and Clock
Get-AppxPackage *alarms* | Remove-AppxPackageCalendar and Mail
Get-AppxPackage *communications* | Remove-AppxPackageCamera
Get-AppxPackage *camera* | Remove-AppxPackageOffice
Get-AppxPackage *officehub* | Remove-AppxPackageGet Started
Get-AppxPackage *getstarted* | Remove-AppxPackageGet Help
Get-AppxPackage *GetHelp* | Remove-AppxPackageMusic
Get-AppxPackage *zunemusic* | Remove-AppxPackageHEIF image support:
Get-AppxPackage *HEIFImageExtension* | Remove-AppxPackageMicrosoft ToDo
Get-AppxPackage *Todos* | Remove-AppxPackageMicrosoft Teams
Get-AppxPackage *Teams* | Remove-AppxPackageMovies and TV
Get-AppxPackage *zunevideo* | Remove-AppxPackageBing Finance
Get-AppxPackage *bingfinance* | Remove-AppxPackageBing News
Get-AppxPackage *bingnews* | Remove-AppxPackageOneNote
Get-AppxPackage *onenote* | Remove-AppxPackagePeople
Get-AppxPackage *people* | Remove-AppxPackagePhone
Get-AppxPackage *windowsphone* | Remove-AppxPackagePhotos
Get-AppxPackage *photos* | Remove-AppxPackagePicsArt
Get-AppxPackage *picsart* | Remove-AppxPackagePowerAutomate
Get-AppxPackage *PowerAutomateDesktop* | Remove-AppxPackageScreen and Sketch Snipping Tool
Get-AppxPackage *ScreenSketch* | Remove-AppxPackageSkype
Get-AppxPackage *skypeapp* | Remove-AppxPackageSticky Notes
Get-AppxPackage *MicrosoftStickyNotes* | Remove-AppxPackageSports
Get-AppxPackage *bingsports* | Remove-AppxPackageVoice recorder
Get-AppxPackage *soundrecorder* | Remove-AppxPackageWeather
Get-AppxPackage *bingweather* | Remove-AppxPackageWebP
Get-AppxPackage *WebpImageExtension* | Remove-AppxPackageYour Phone
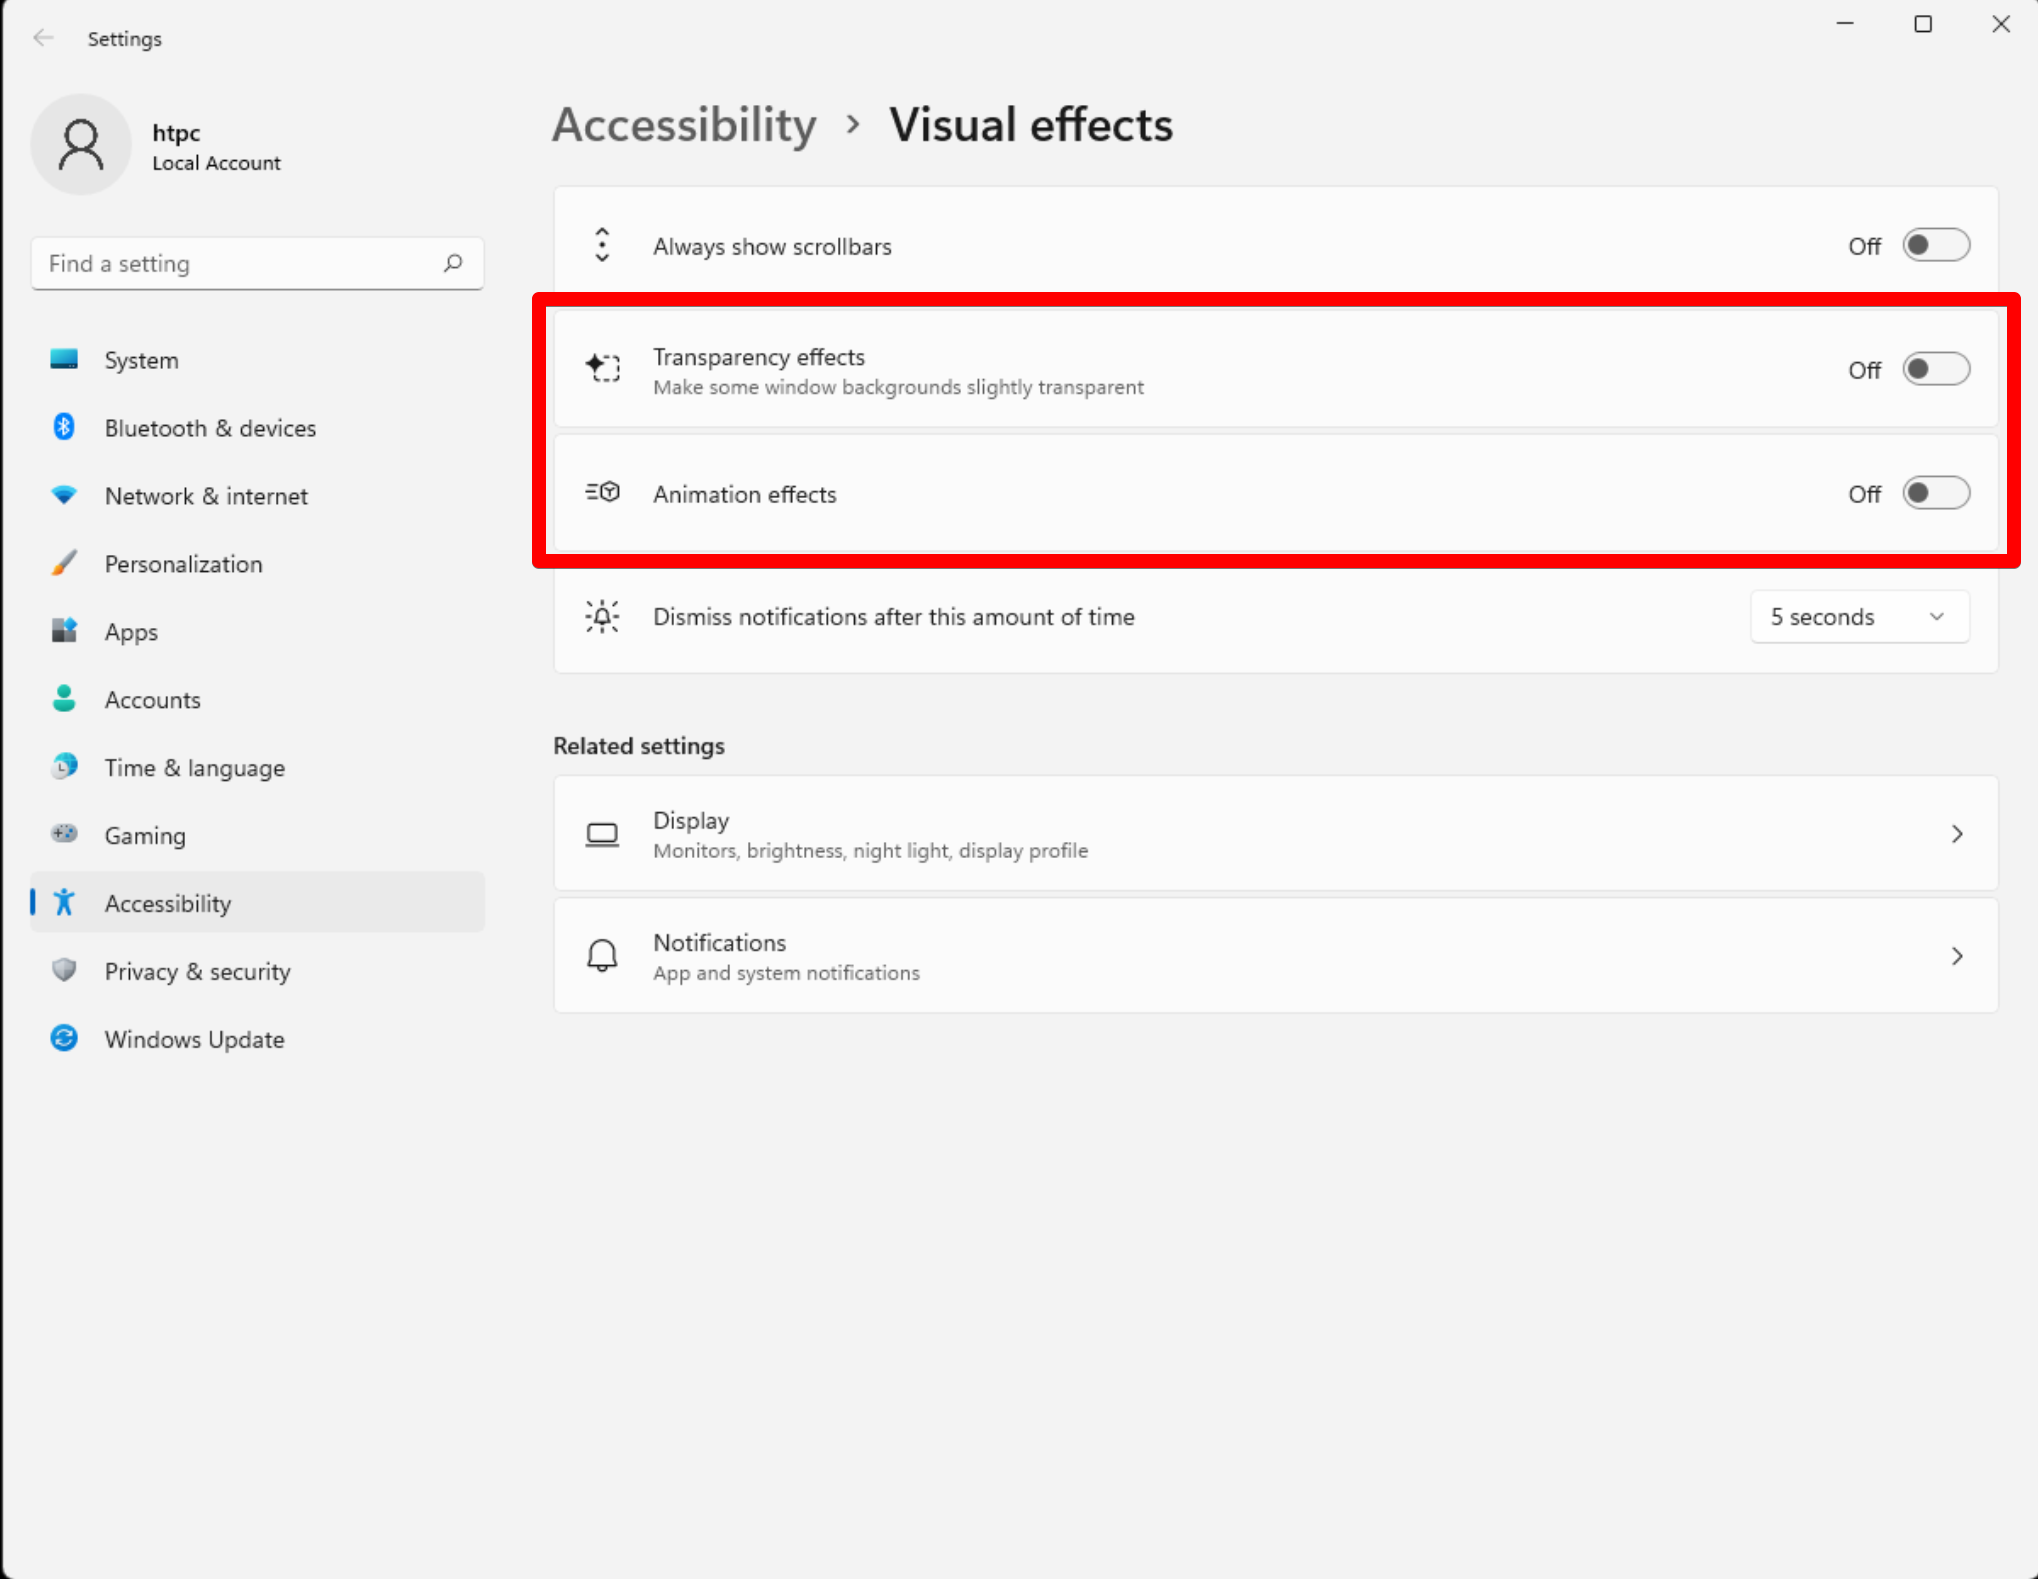
Get-AppxPackage *YourPhone* | Remove-AppxPackageFinally, open the Accessibility settings, choose Visual effects, and disable transparency and animations:
Then right click on the taskbar and choose Taskbar settings. Disable chat and widgets:
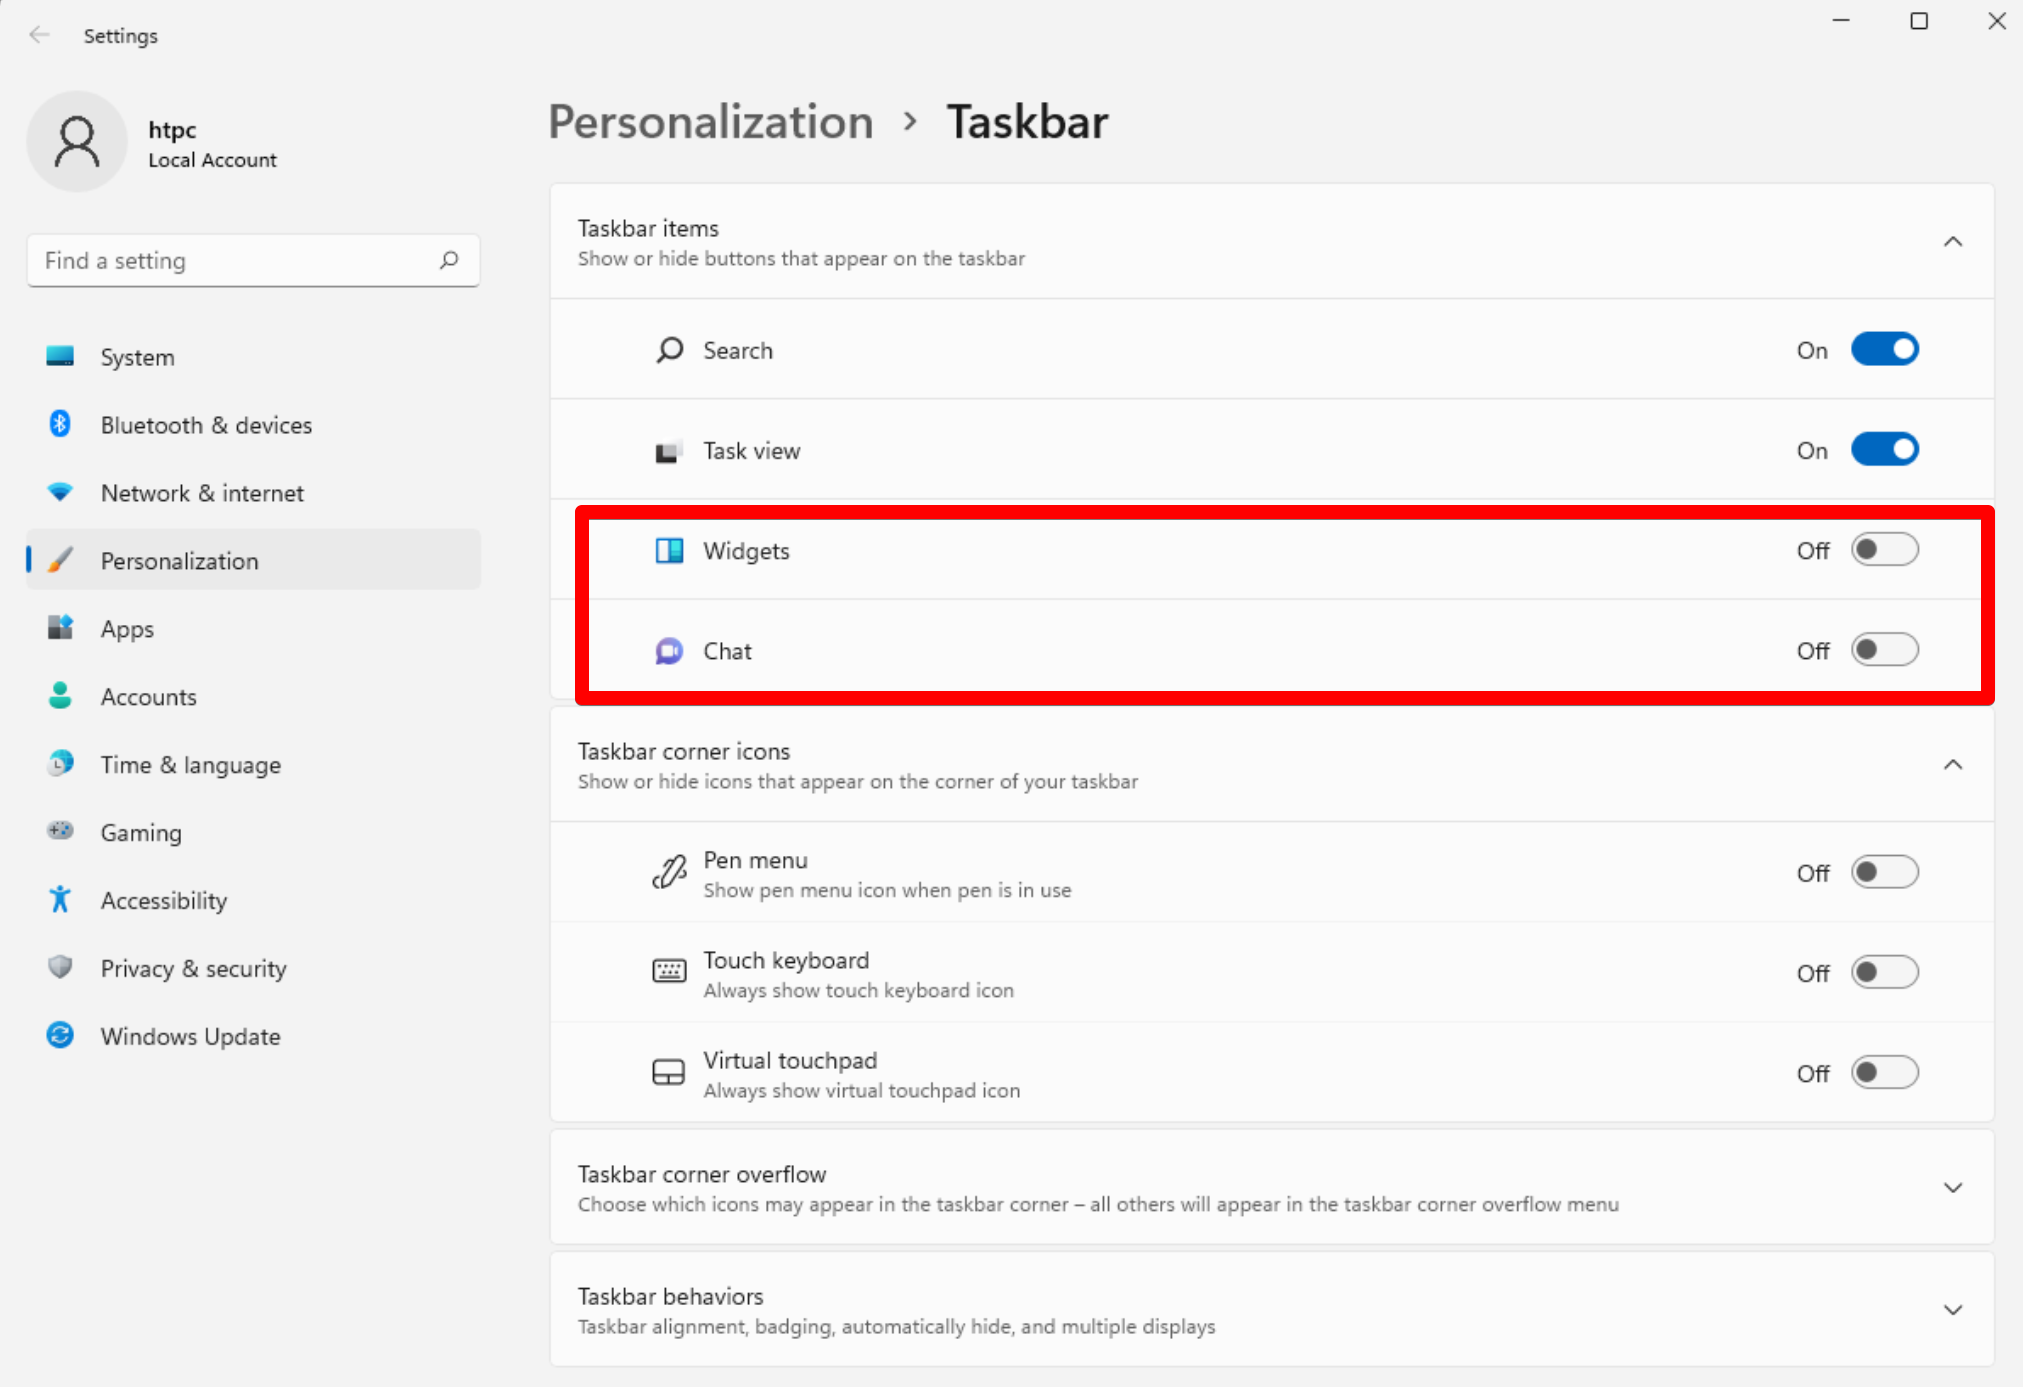
Your system should be much snappier now.
Set Up Network Name, Workgroup, and Sharing.
The next thing you’ll want to do is get your computer named and configured on your network. Make sure it’s added to the same workgroup as your media files so you can map drives and get to your content.
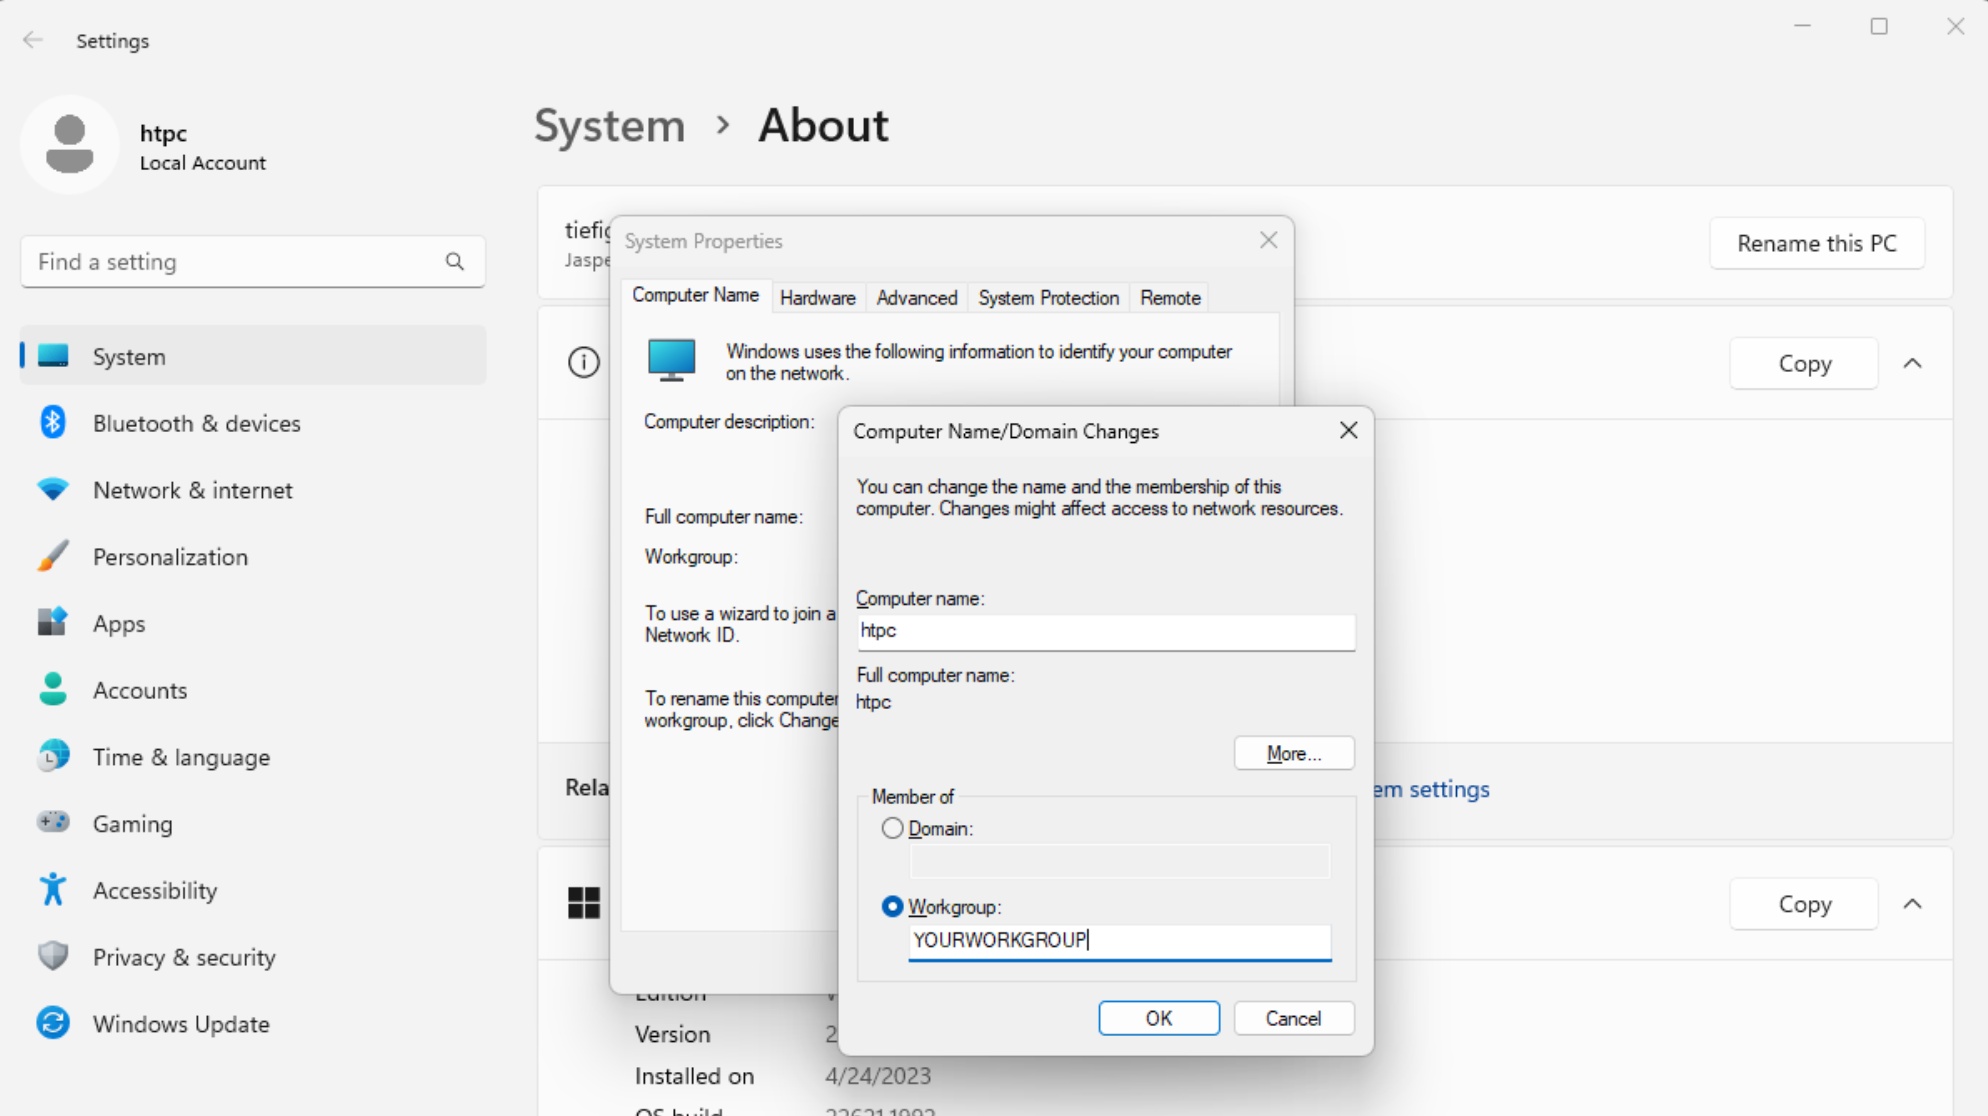
Give the computer a name and add it to the workgroup.
You’ll want your computer to have a name and be part of the same workgroup as other computers on your network.
- Open Settings.
- Select System on the right side, select About on the right side.
- Clock the Advanced system settings link to open System Properties.
- Ensure the Computer Name tab is focused, and click on the Change button.
- Enter the name and workgroup.
- Press Ok.
- Restart the computer.
Ensure the computer is visible on the network.
Go to Settings, select Network & Internet, select Advanced network settings, and select Advanced sharing settings.
Ensure that the computer is visible and that file and print sharing is on for the current profile.
![[attachments/advancesharesettings.png]]
With this set, other computers can see your computer.
(Optionally) Share the C drive
You’ll find it much easier to configure things and move files to your device if you share out the hard drive. This way you can transfer files to the machine without loading up a physical disk and walking around to the machine.
- Right click the C drive.
- Choose Properties
- Choose Sharing.
- Click on Advanced.
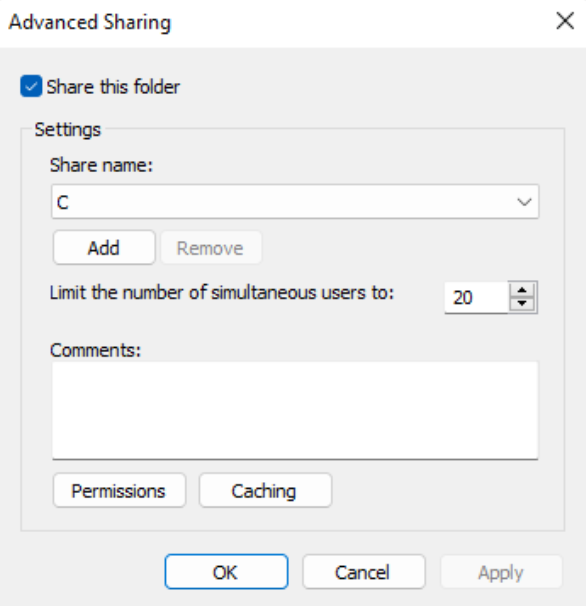
Share the C drive.
Choose Permissions
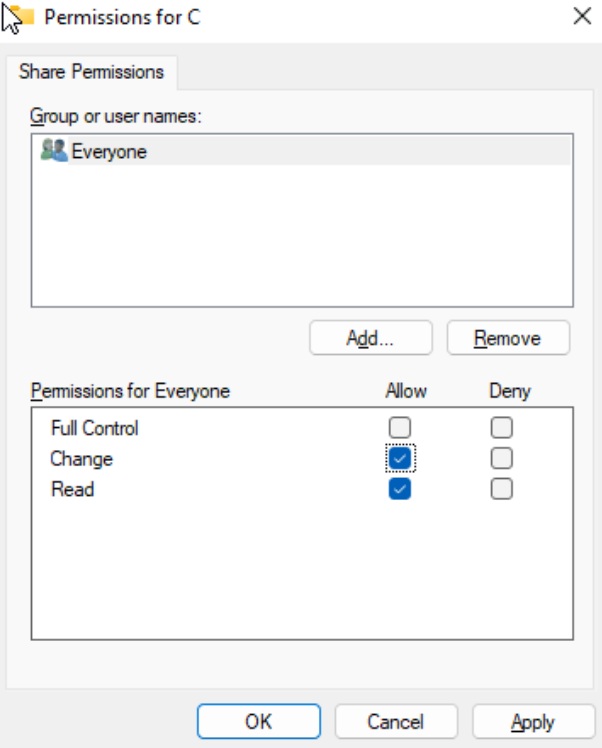
Click OK to save the permissions.
Click OK again to close the sharing screen.
Now open Control Panel, select System and Security, choose Windows Defender Firewall, and choose Allow an app or feature.
Ensure that File and Print Sharing are allowed for your private network.
If it’s not checked, click Change settings, make the change, and press OK.
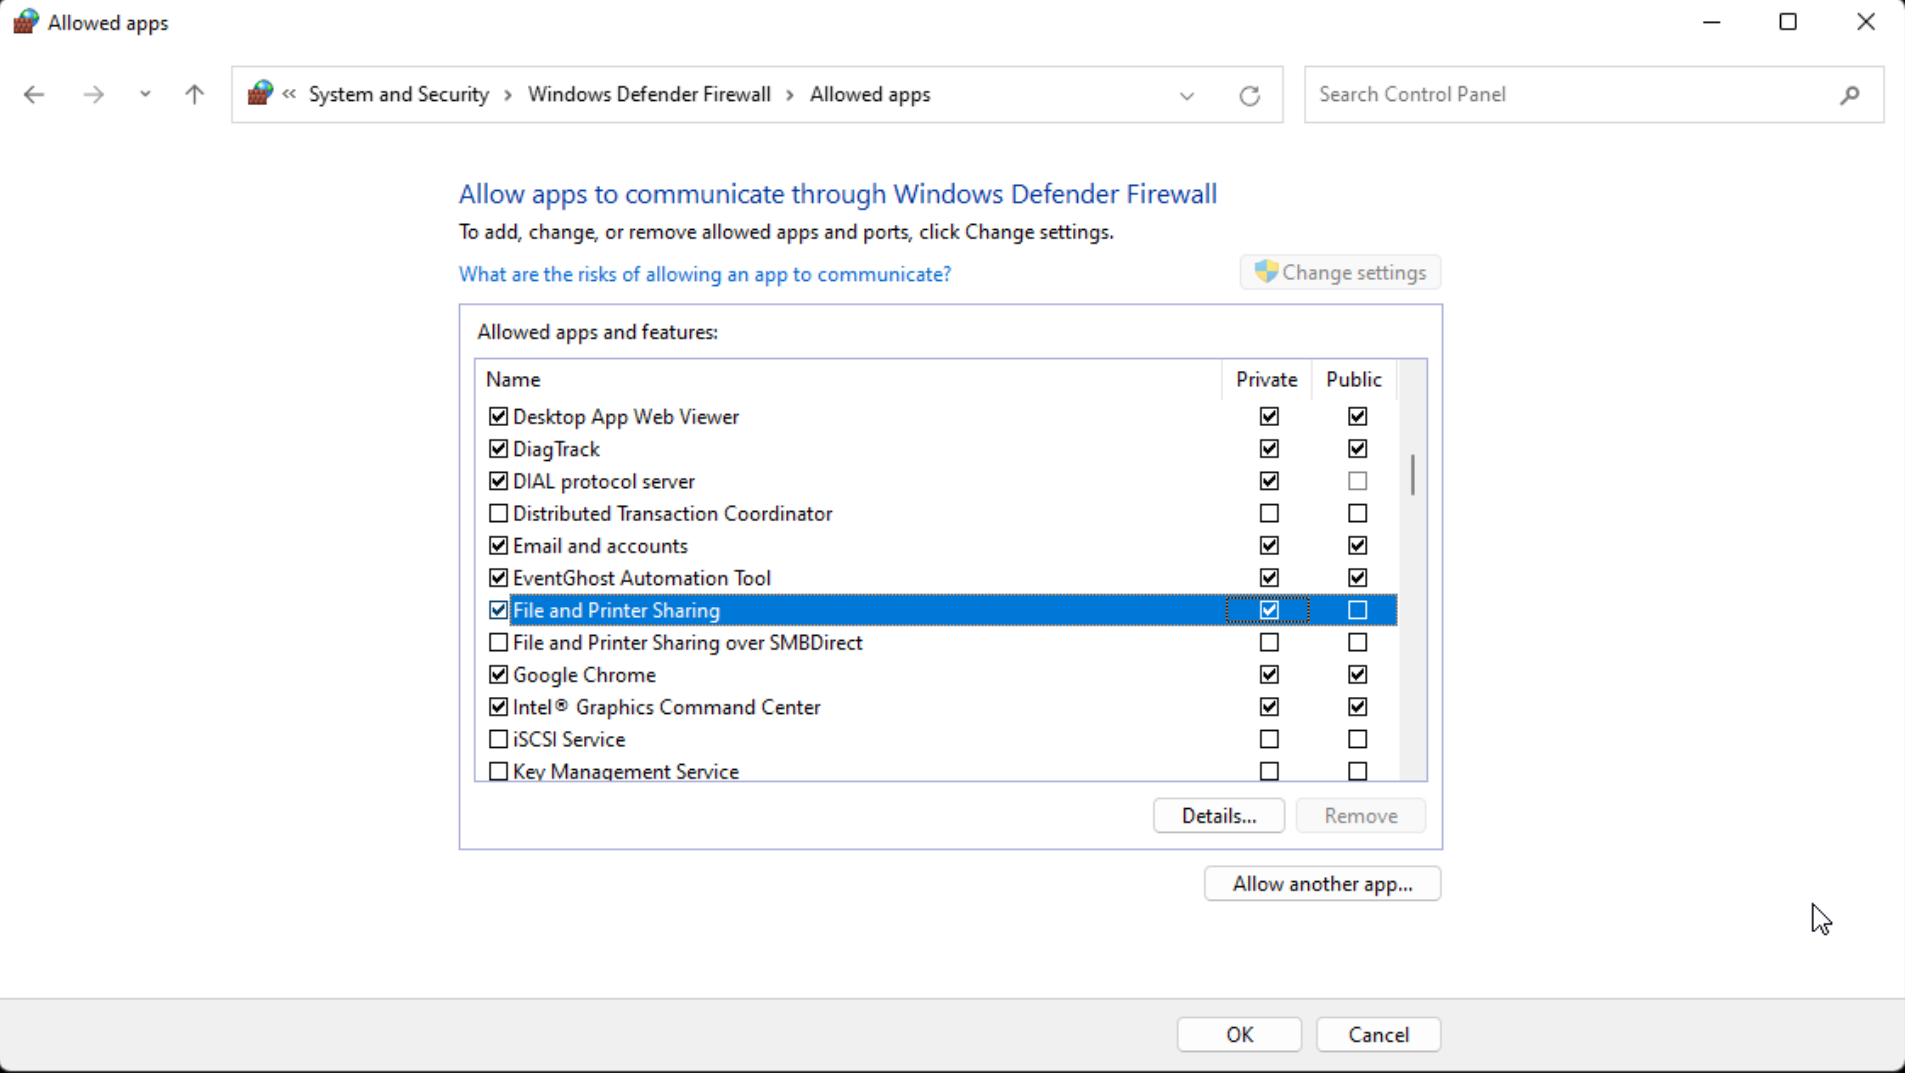
You can now connect to your machine as \\machine\c
Disable Windows Login
If your machine will be connected to a TV, you’ll want to skip the login process in case it reboots. Of course, this is a security hole, so do this at your own risk.
First, open regedit and locate this key:
HKEY_LOCAL_MACHINE\SOFTWARE\Microsoft\Windows NT\CurrentVersion\PasswordLess\Device
Change DevicePasswordLessBuildVersion to 0.
- 0 is disabled
- 2 is enabled
Then press Windows+R and run netplwiz
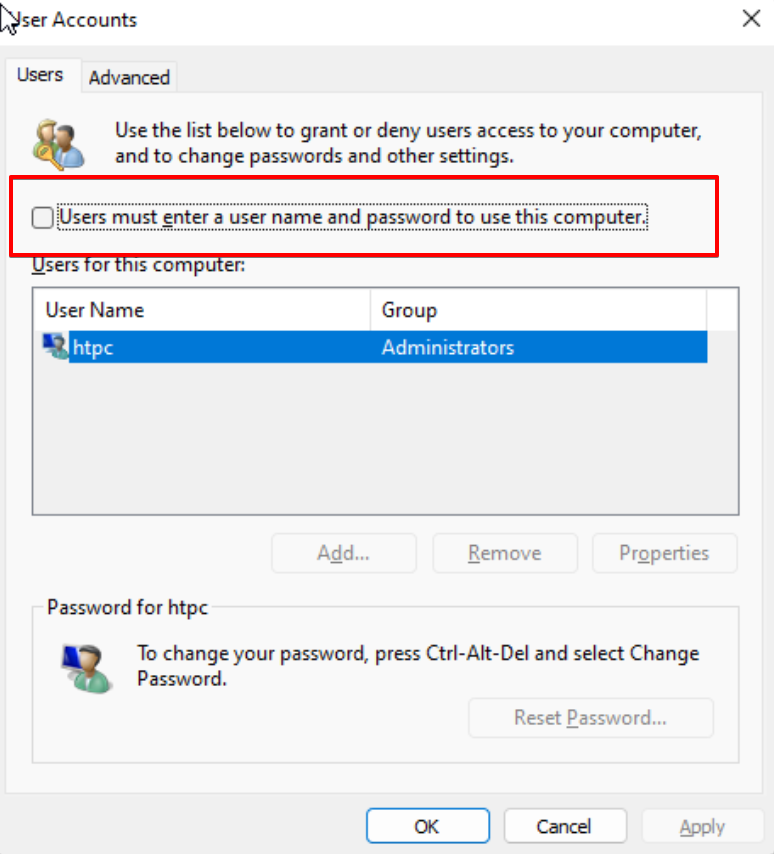
When you uncheck the box and press Apply you’ll get a password prompt:
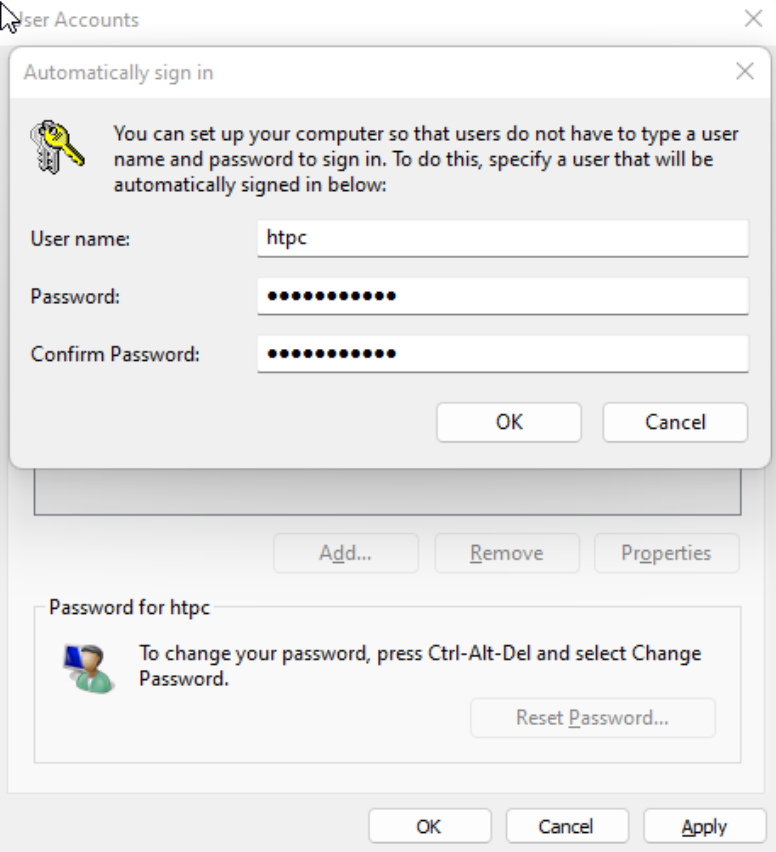
Enter the password for your account and click OK. Then click OK on the netplcwiz dialog.
Restart to see the changes. You’ll log in automatically.
(Optional) Set up VNC for Remote Administration
Installing VNC will give you quick access to the desktop from another machine. You’ll find this useful if you need to make changes and want to do it from a full computer. Again, this creates a security hole, so you’re trading security for convenience here.
Download TightVNC and install it.
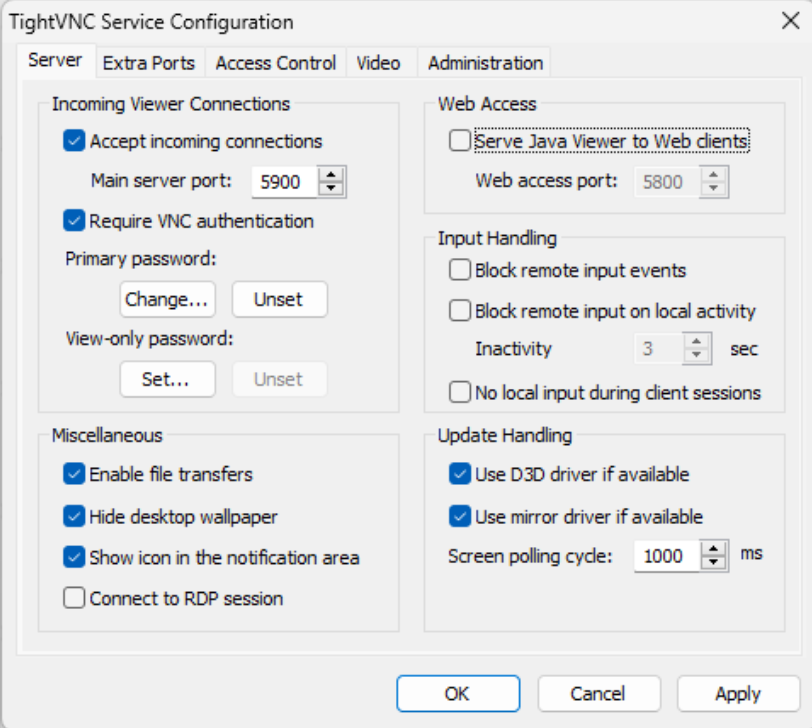
Configure it using the following settings:
- Accept incoming connections
- Require VNC authentication
- Don’t hide desktop wallpaper.
- Set a primary password.
- Enable file transfers.
Your settings should look like those set in the following image:
That completes the network setup for your machine.
Configure J.River Media Center for TV displays
J.River Media Center is a fantastic media player with support for movies, videos, images, and audio files. It also has a “Theater View” interface so you can navigate through your library on the television.
The best way to configure J.River Media Center is to install the software on a standalone server. Configure your playlists, media, and other files on that machine. Then install J.River on your HTPC and connect to your server’s library.
You can also put your movies, shows, and music on a network share and import those into J.River Media Center and it will work just as well as if they were local.
For this guide, you’ll run it all locally on the machine.
Install J.River Media Center 27:
Then load your movies and videos into its library. In the sidebar, select Main Library.
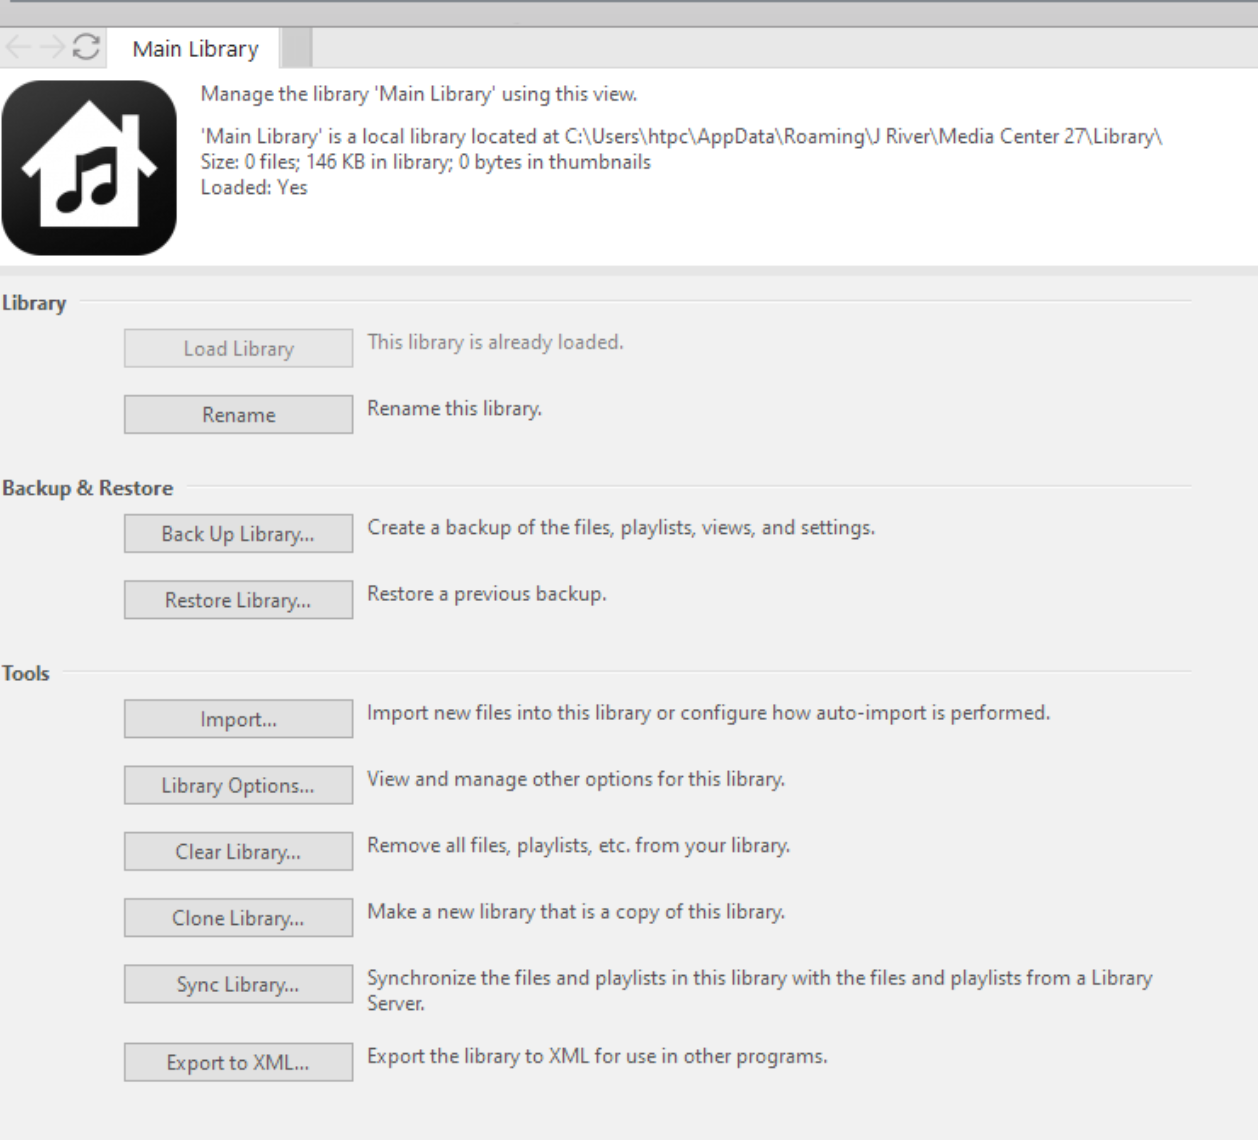
Choose Import to import your files into the library.
Once you have that configured, set up the TV interface.
Configuring Theater View
Select the Tools menu, choose Options and go to Theater View:
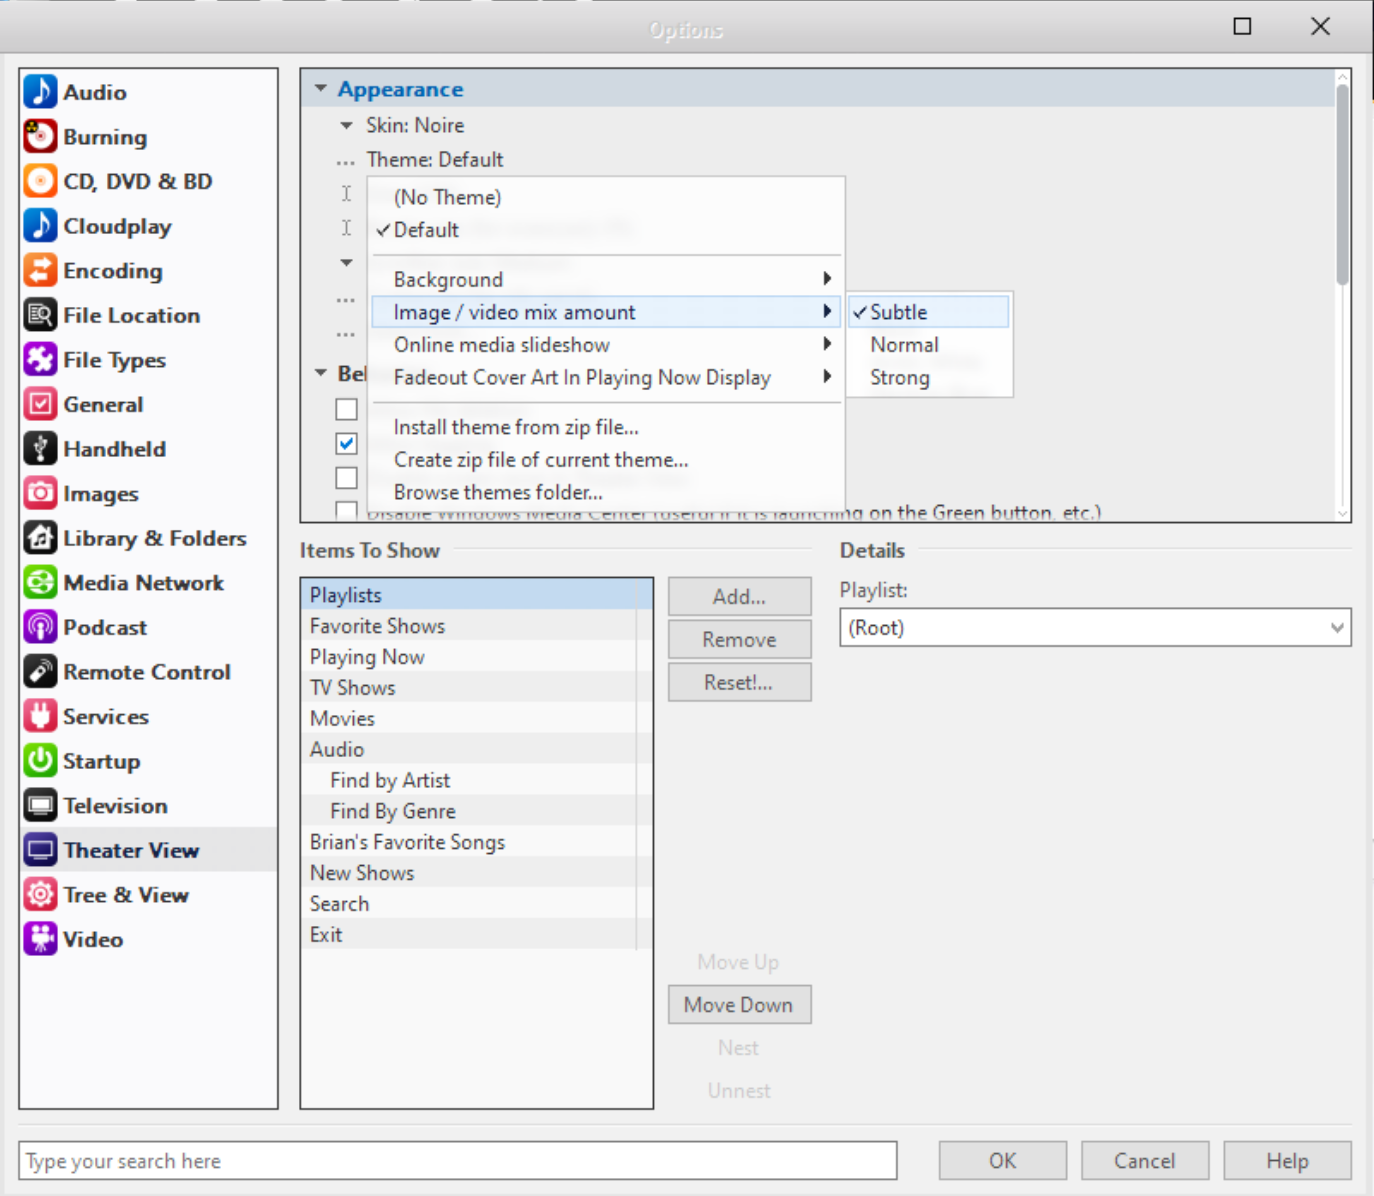
- Use the Noire skin
- For Theme, set the image / video mix to Subtle
Under Items to Show you can configure various views. You can link playlists you’ve created, custom filters for shows, and more. The Items to Show are part of your library, and if you set these up on a server, you don’t have to configure these on the J.River Media Center instance you’ve installed on your HTPC. Consult the documentation for J.River.
Finally, make Theater View the default when J.River launches and turn off services you don’t need.
Configure J.River Options
Within Options, select the Startup section.
Make Theater View the default when you start J.River Media Center.
![[attachments/jriver_startup.png]]
You don’t need to set it up to start when Windows starts. You’ll use another program for that later.
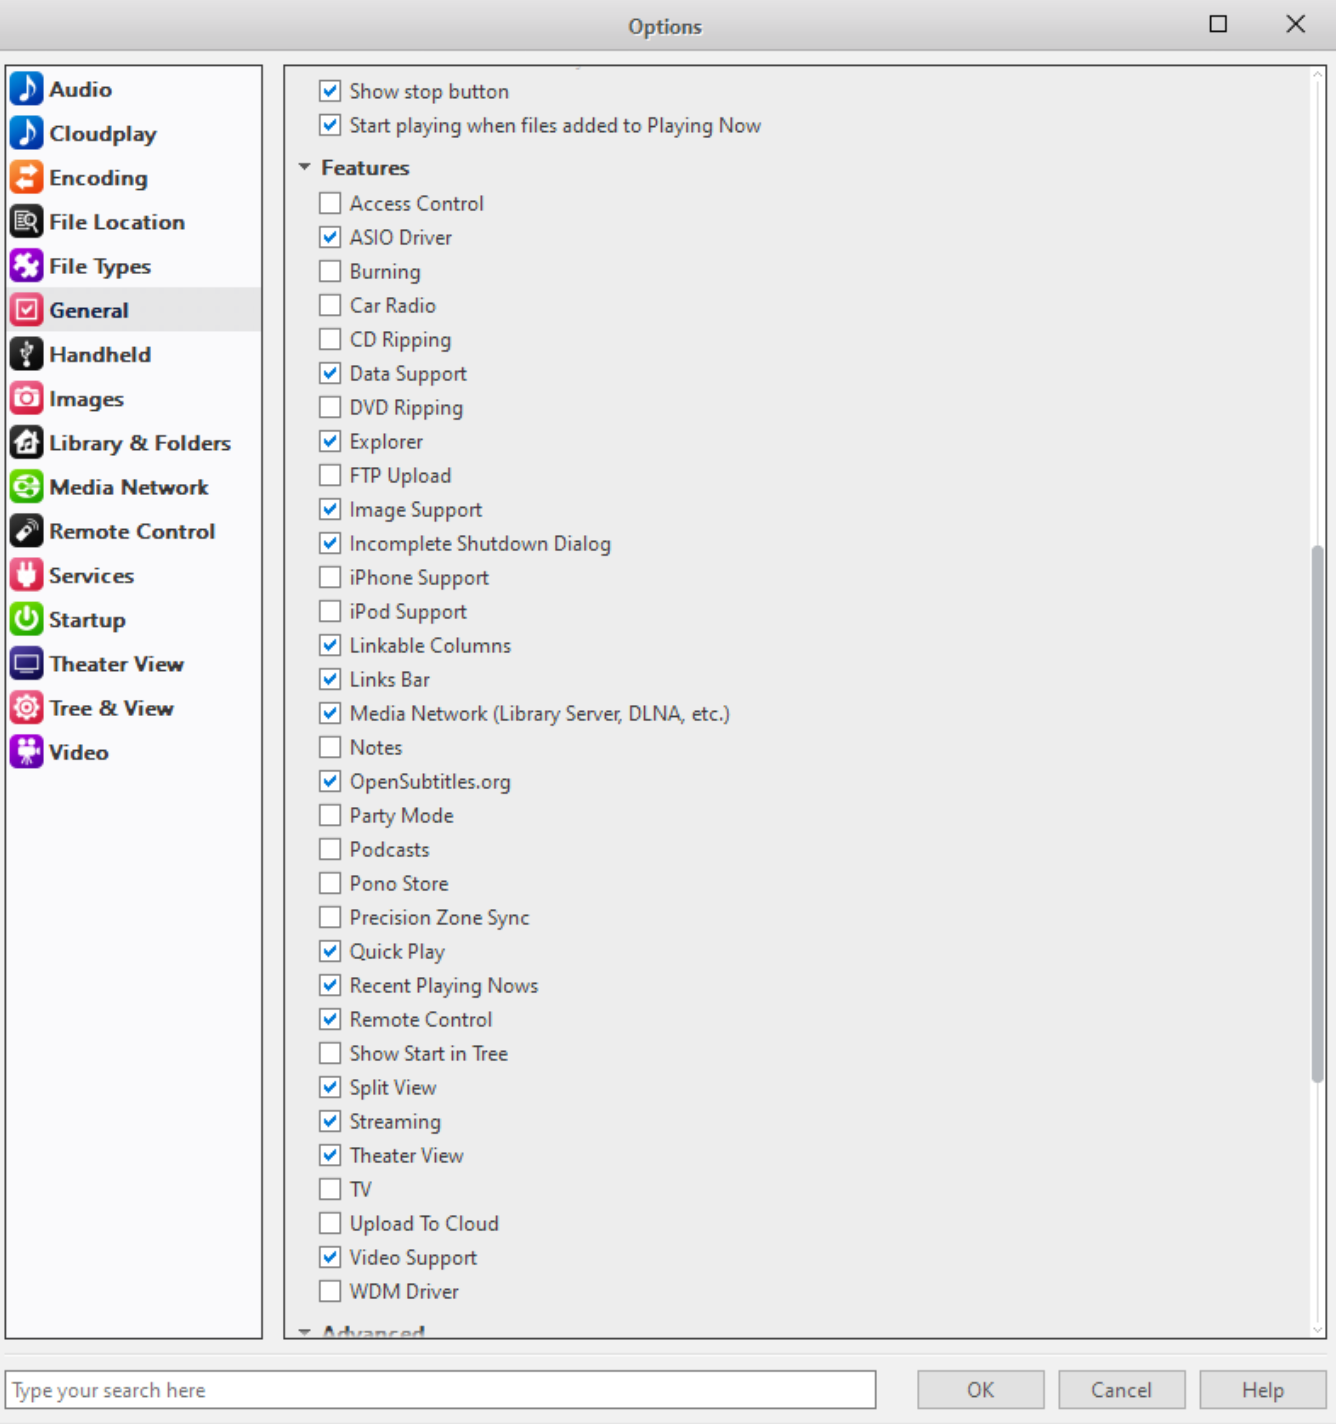
Next, select the General section and disable features you don’t need. This will speed up J.River and use less resources. Under the Features section, only select the following:
- ASIO Driver
- Data support
- Explorer
- Image support
- Incomplete Shutdown Dialog
- Linkable Columns
- Links Bar
- Media Network (Library, Server, DLNA, etc.)
- OpenSubtitles.org
- Quick Play
- Recent Playing Nows
- Remote Control
- Split View
- Streaming
- Theater View
- Video Support
Set Up Games and Emulators
You’ll install RetroArch, Steam, and ES-DE to make everything work smoothly.
Set Up a Game Launcher using ES-DE
You’ll use ES-DE as the game frontend, as it has the lowest profile and most compatibility out of the options available. You’ll use the portable version as it’s already preconfigured, and this makes updating a breeze later. As long as you place your files and emulators in the appropriate folders inside of the ES-DE folder, everything will work without issue.
Download the Portable version:
Unzip the portable version to c:\games\ . This creates the path c:\games\ES-DE
Inside the ES-DE folder you’ll find a place for your roms and emulators. You’ll set up RetroArch next.
Set Up RetroArch
Download the 64-bit RetroArch standalone download:
Unzip this to c:\games\ES-DE\emulators. This creates the path c:\games\ES-DE\emulators\RetroArch-Win64.
Verify this path before moving on, as this is the default location ES-DE expects to find the 64-bit Windows version of RetroArch.
Download Emulation Cores in RetroArch
RetroArch uses “cores” to emulate games. You’ll need a core for NES games, another core for Arcade games, and other cores for other systems. You install these cores through RetroArch itself.
Launch RetroArch by clicking on c:\games\ES-DE\emulators\RetroArch-Win64\retroarch.exe.
You’ll see the main menu:
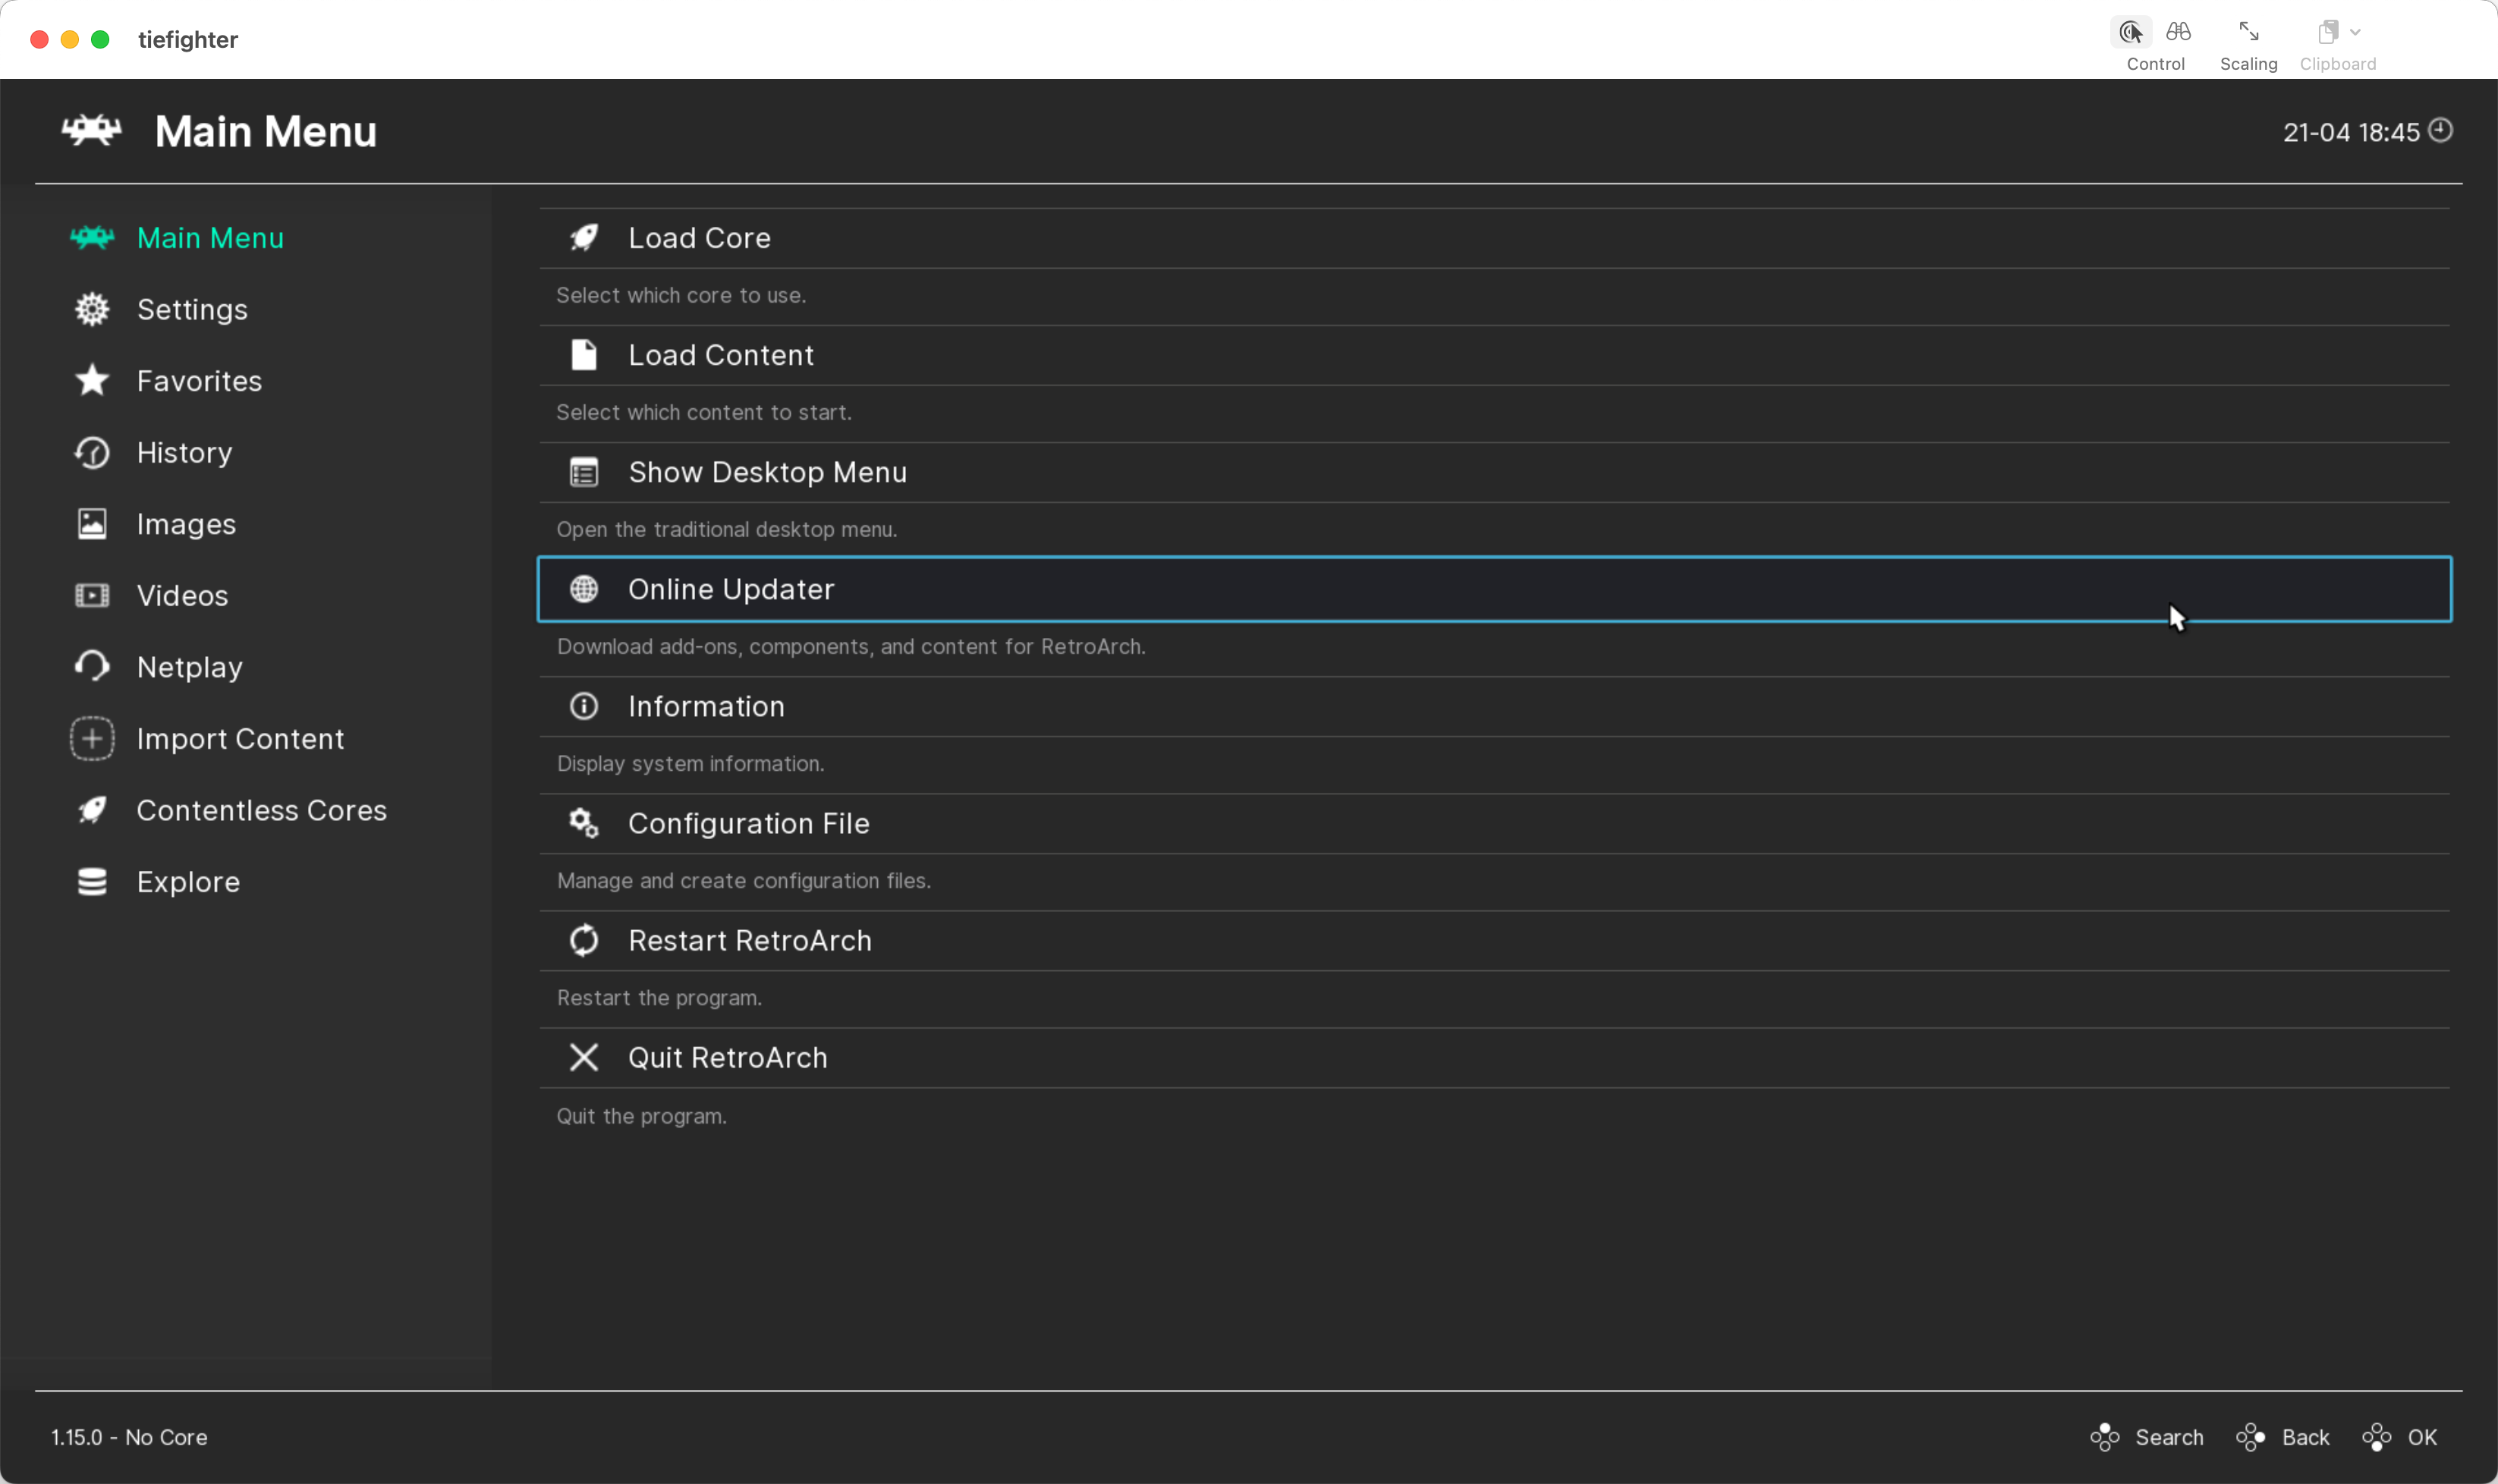
Download the following cores:
- Arcade:
- Mame2003-Plus (which has compatibility with many games and works well on older slower systems.)
- Arcade: FinalBurn Neo (which has better support for certain games)
- Nintendo Gamecube: Dolphin
- Nintendo NES:
- Use Mesen if you have a faster, newer system
- Use Quicknes if you have an older Atom-based processor
- Nintendo SNES: Snes9x Current
- Sega: Genesis Plus GX
- Sony PSP: PSPSS
- Sony PS1: Beetle
Press the Backspace key twice to return to the main menu.
Configure your controller to exit games.
RetroArch has built-in support for the Xbox 360 and Xbox One controllers, so there’s no configuration you need to do to make those work. Plug them in or power them on and RetroArch will assign them.
However, you can set up a controller shortcut to exit games so you don’t have to reach for a keyboard.
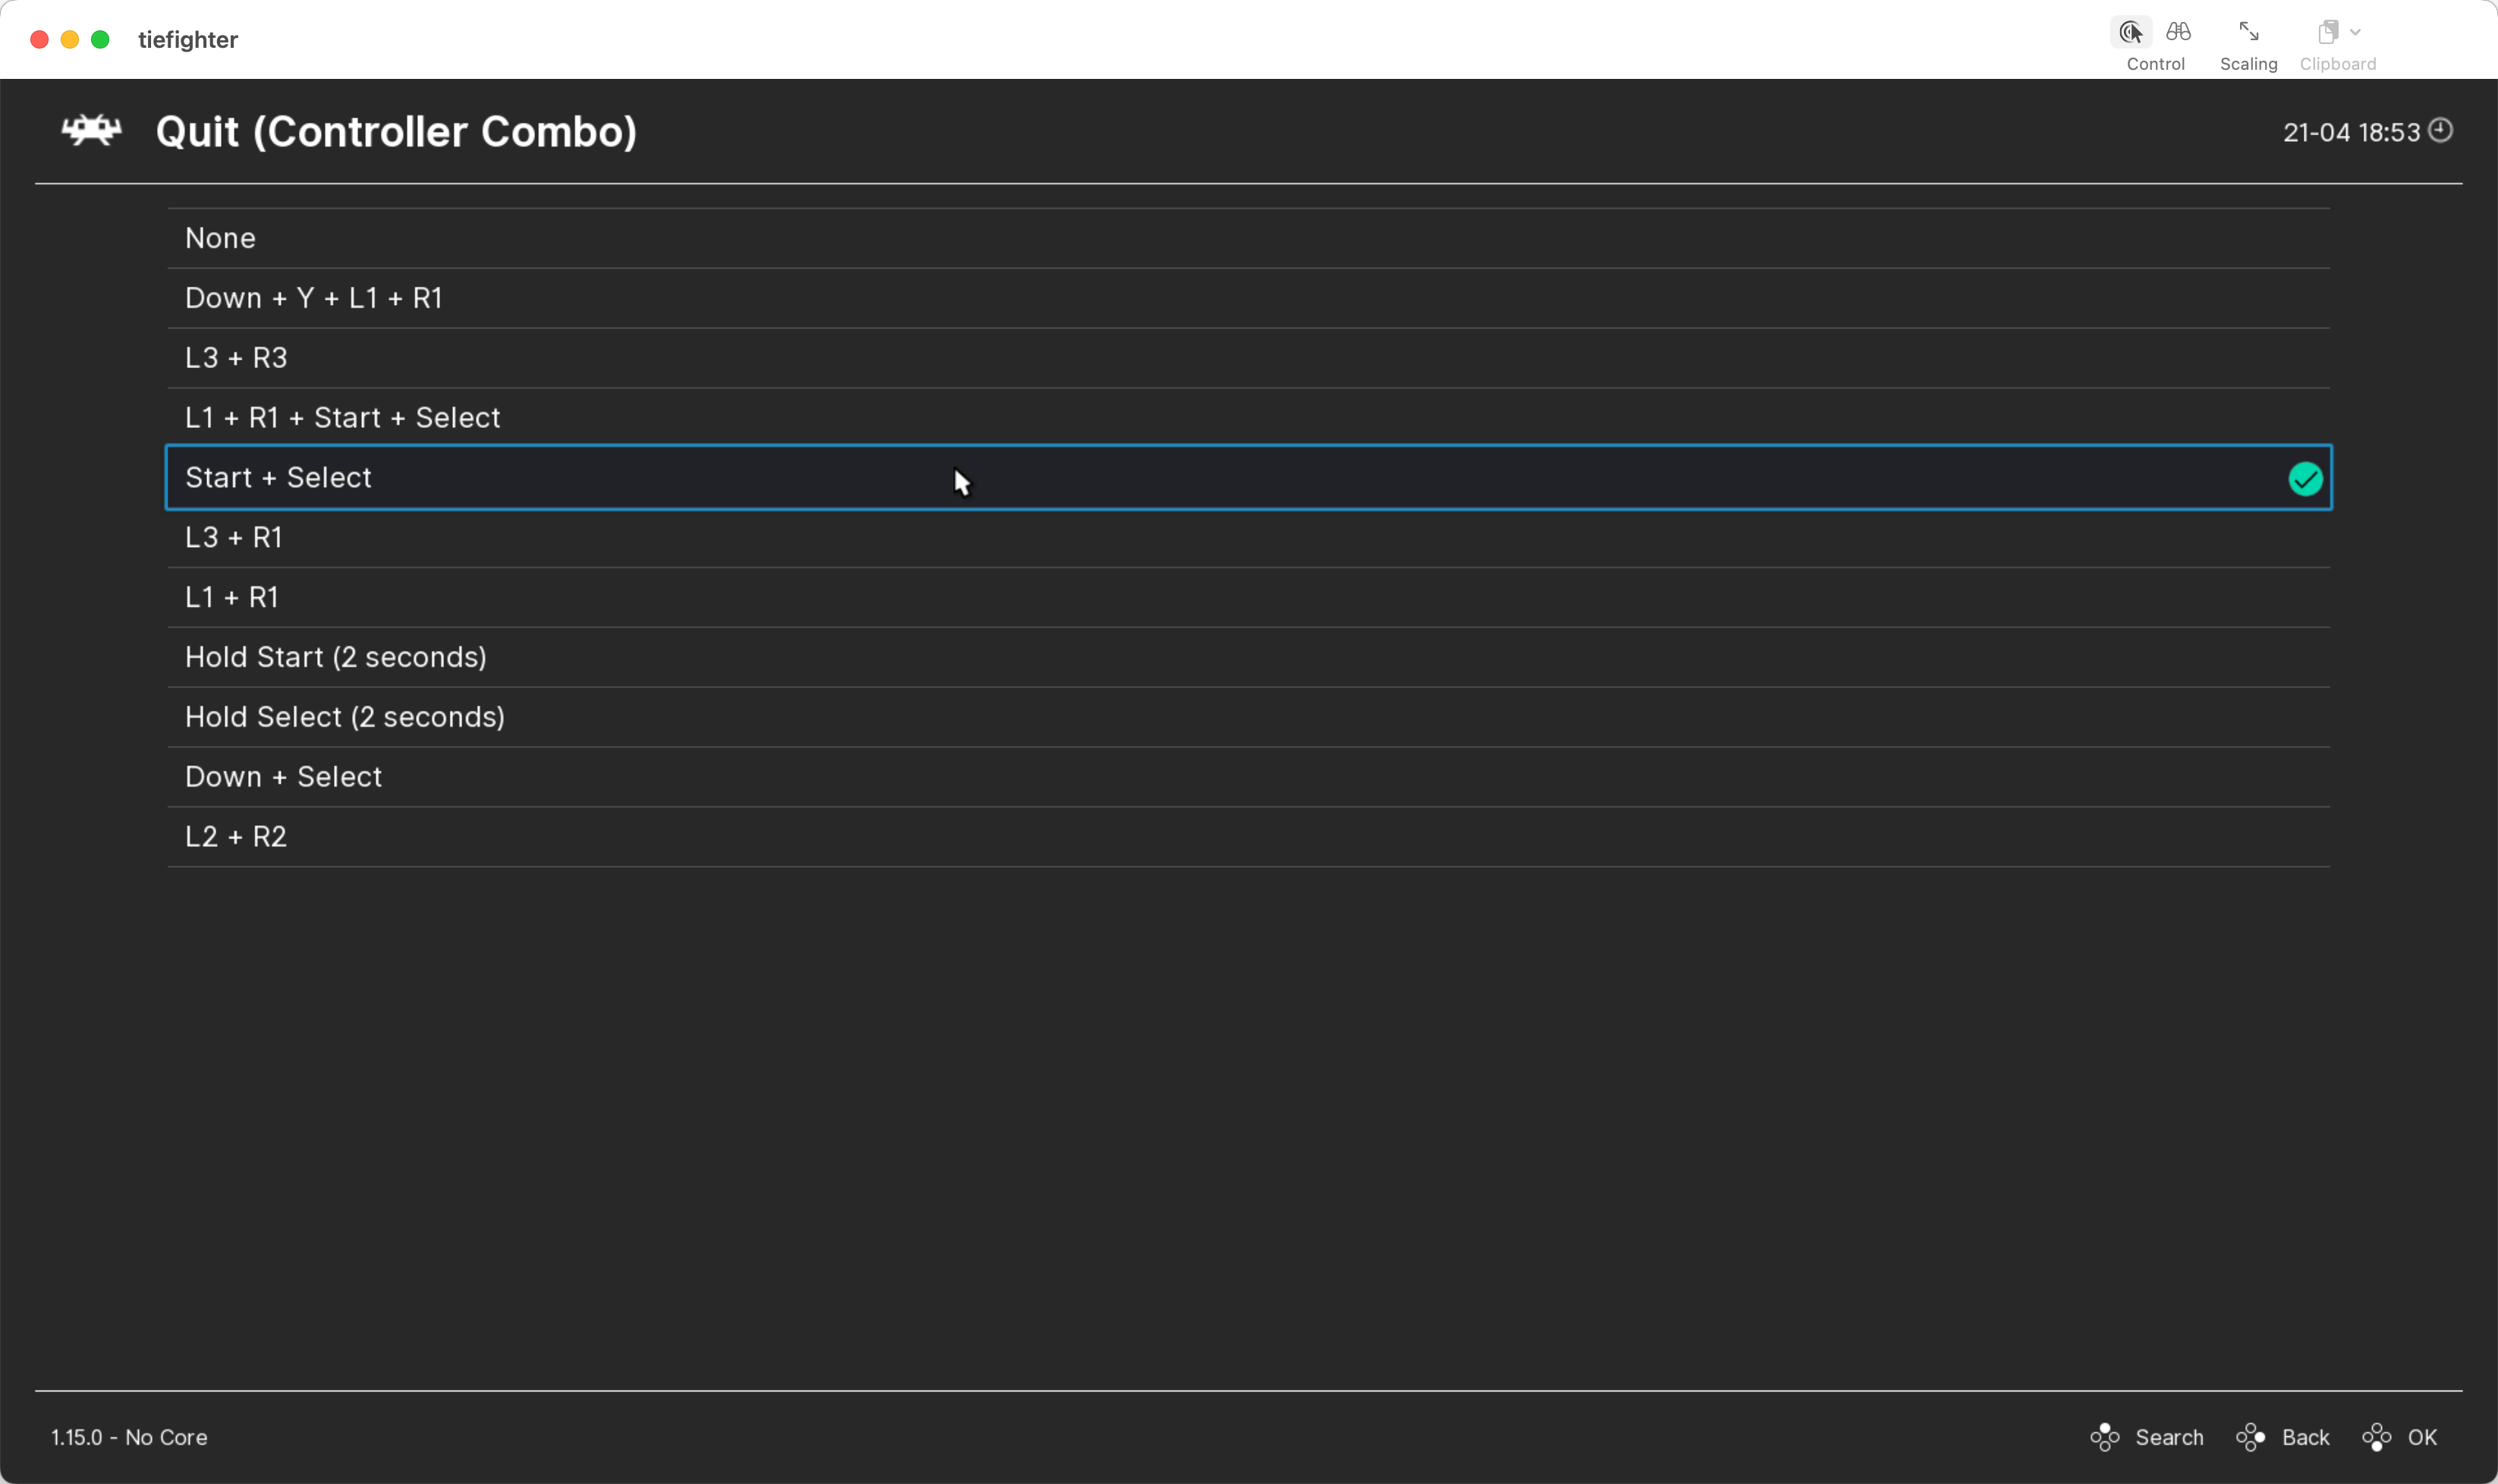
From the RetroArch main menu, choose Settings, then Input, then scroll to Hotkey, then scroll down to Quit (Controller Combo).
Choose Start+Select.
Press the Backspace key until you return to the main menu.
Press the ESC key twice to exit RetroArch.
Add BIOS files to RetroArch
Some emulators will need BIOS files. For example, the PSX emulator needs PSX bios files. Those files are subject to copyright so they’re not linked here. You should dump them from your own original equipment.
- PSX bios
- Place the bios files in
c:\games\EmulationStation-DE\emulators\RetroArch-win64\systemand RetroArch will find them.
- Place the bios files in
Next you’ll set up a PS2 emulator.
Emulating PS2 games with PCSX2
RetroArch’s PS2 emulation has limited support. It’s best to install PCSX2 as a standalone program. EmulationStation supports standalone emulators in addition to RetroArch, so you’ll configure that in this section.
Download Visual Studio C++ Redistributable from https://learn.microsoft.com/en-US/cpp/windows/latest-supported-vc-redist?view=msvc-170 and install it.
Download the Nightly version of PCSX2 from https://pcsx2.net/
Once downloaded, follow these steps:
- Extract the files with 7zip
- Move the extracted files to
c:\games\EmulationStation-DE\emulators\PCSX2 - Rename
PCSX2-Qt.exetoPCSX2-QTX64.exeso EmulationStation can find it.
Once done, you’ll need to place PS2 bios files in c:\games\EmulationStation-DE\emulators\PCSX2\bios. These are copyrighted files and you’ll need to obtain them from your own hardware.
Once the bios files are in place, launch PCSX2. Walk through its wizard, select your BIOS files, and skip scanning for games.
Once you’ve completed the wizard, do the following:
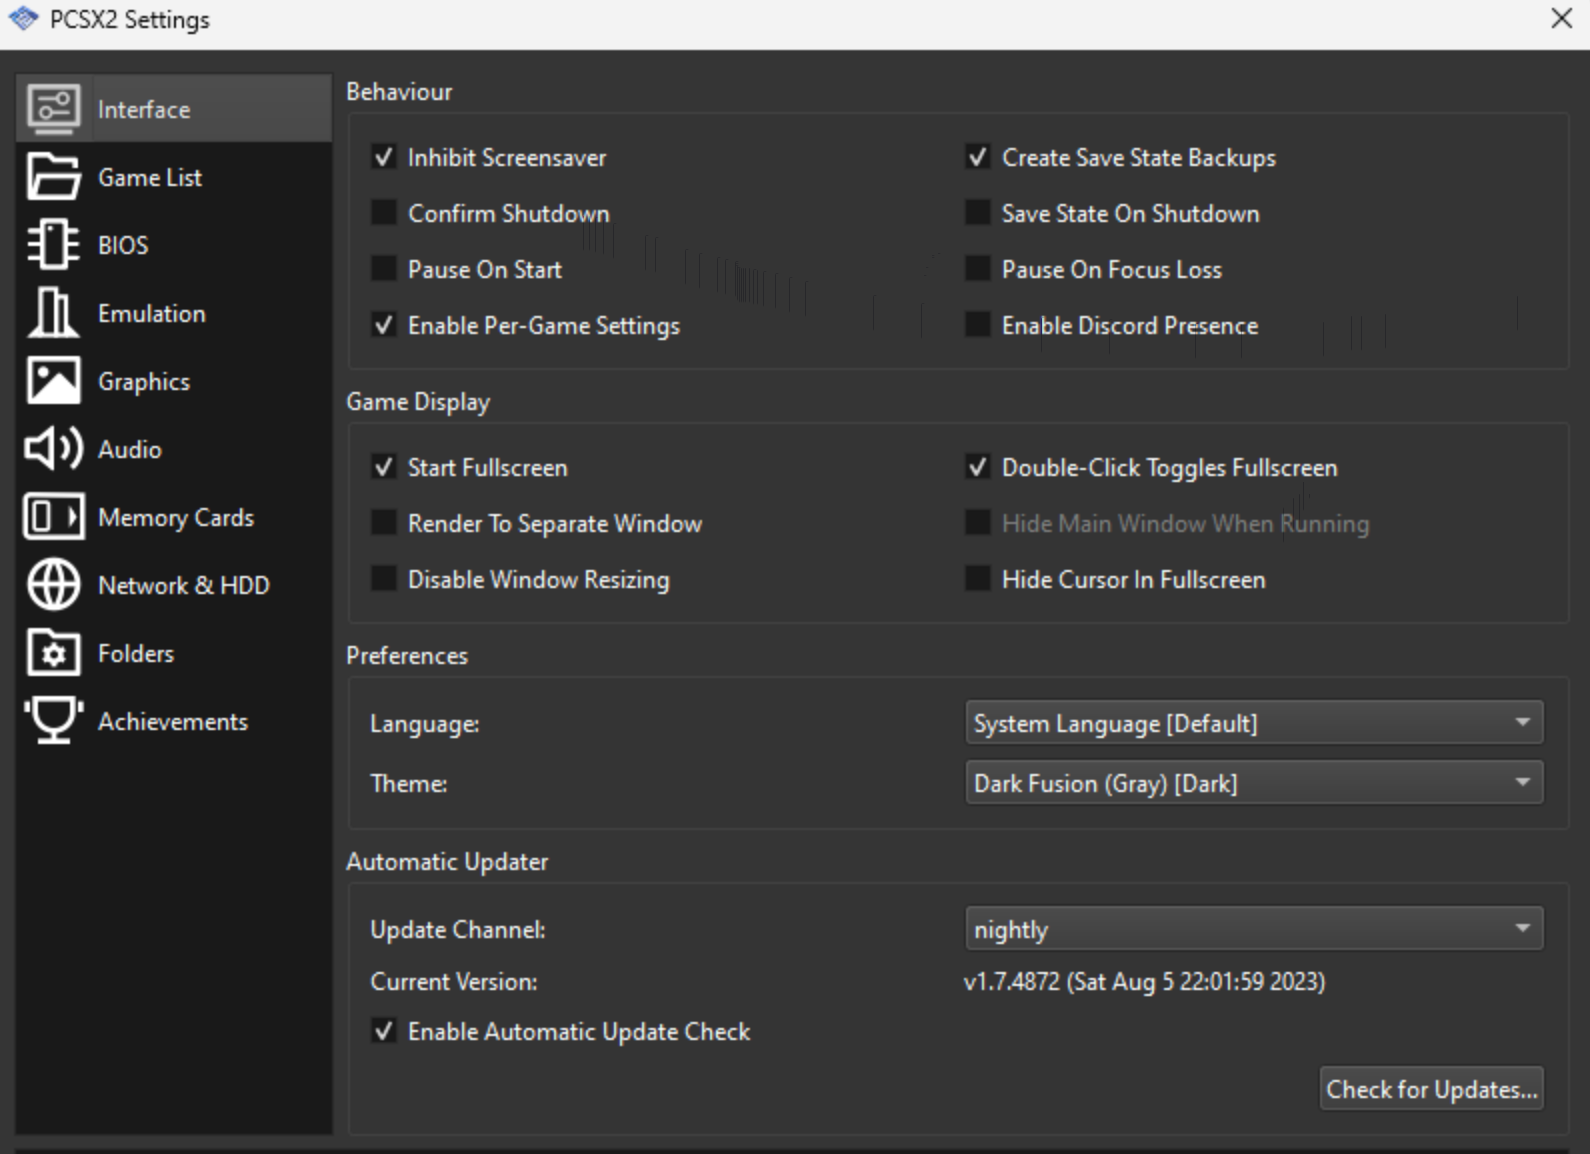
Select Settings and choose Interface and set the following: * Start in full screen mode. * Deselect the option to confirm shutdown. * Do not save state on Shutdown.
Next, under Settings, select Hotkeys, and use the Select and Start buttons as the hotkey to Shut down virtual machine.
![[attachments/pcsx2_hotkey.png]] Exit PCSX2.
Next you’ll set up your roms.
Set up roms
Like BIOS files, ROMs are copyrighted material and this document won’t have links to any. If you have your own files that you’ve dumped, you’ll place them in the appropriate folders within Emulation Station.
ES-DE has a ROMs folder and a ROMs_ALL folder.
- Copy the systems you’ll use from the
ROMs_ALLfolder to theROMsfolder - Place the roms into the appropriate folders.
- You can place arcade ROM files in the
arcadefolder or themamefolder. - PSX games should be in CHD format rather than BIN/CUE files to avoid games getting listed twice in the interface. If you have BIN/CUE files instead because you’ve created your own backups, use
chdmanfrom Mame to convert them. See this page for more information.
- You can place arcade ROM files in the
Once you’ve placed your ROM files in the right location, launch ES-DE and it will create sections for each system by scanning the folders.
Configure Bezels
When you run games from various systems on a wide-screen display, the game will be centered on the screen, but the surrounding area will be black. You can load game artwork to fill that space. These bezels are especially nice for arcade games as they often resemble the artwork that surrounded the screen, including instructions on how to play.
Download the Bezel Project utility for Windows.
Install the tool. You’ll have to allow Windows to run the tool, as Windows Defender will prevent you from running it as it’s unsigned.
Install the tool to c:\htpc\bezel project rather than the default location.
Once installed, launch the tool. Dismiss the end user license agreement and the notification about configuring bezel locations.
Once the app is loaded, click Preferences and fill in the location for RetroArch:
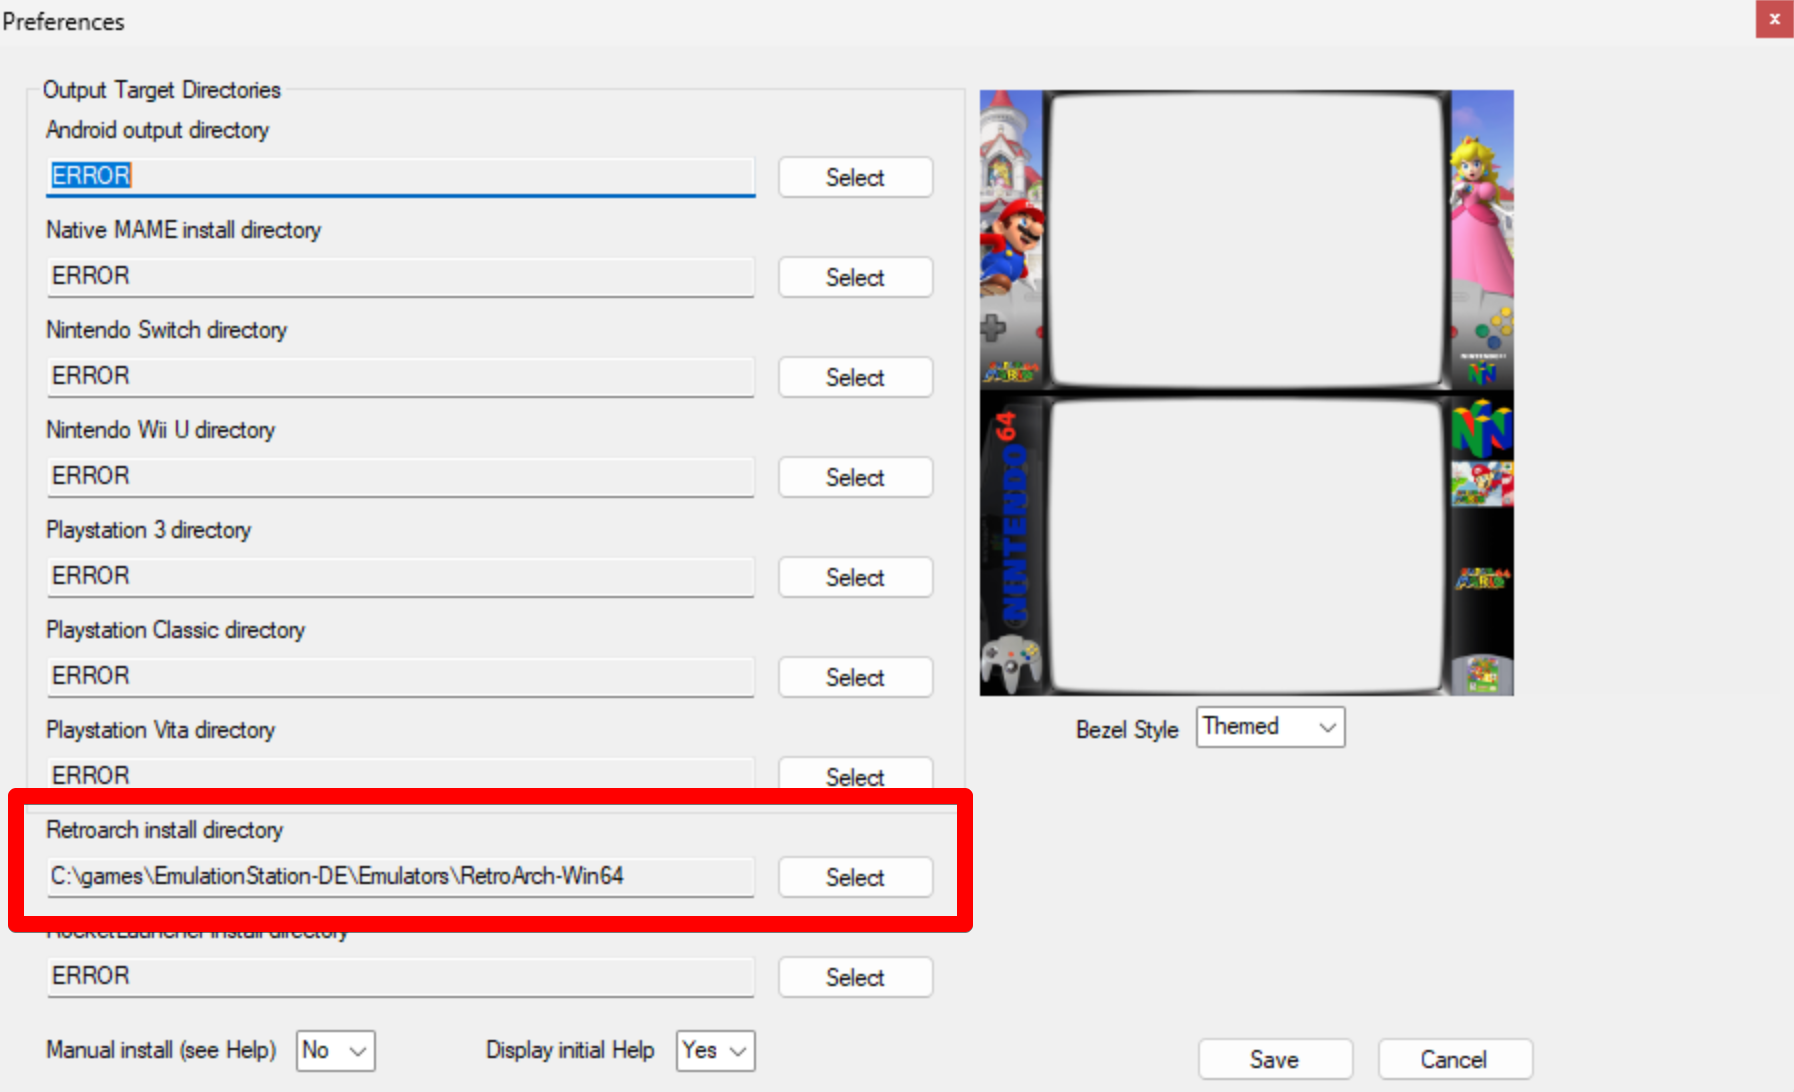
Press Save to return to the main menu.
Ensure Download/Uninstall/Update bezel pack is selected, and then select the radio button next to Process RetroArch is selected:
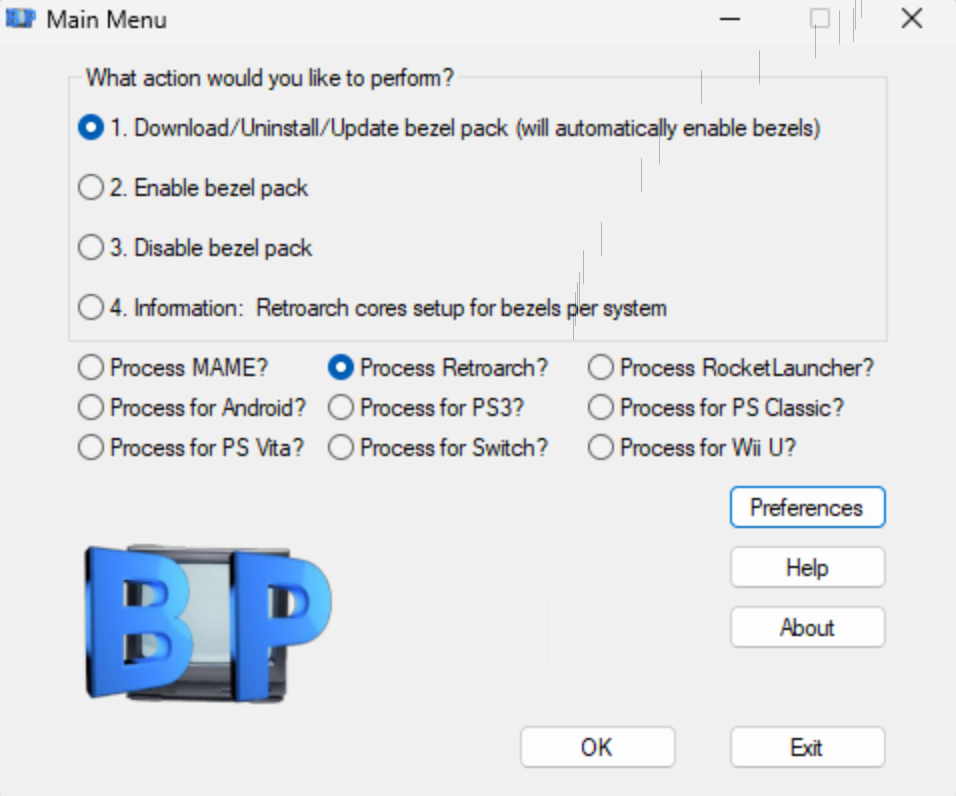
Press Ok to continue.
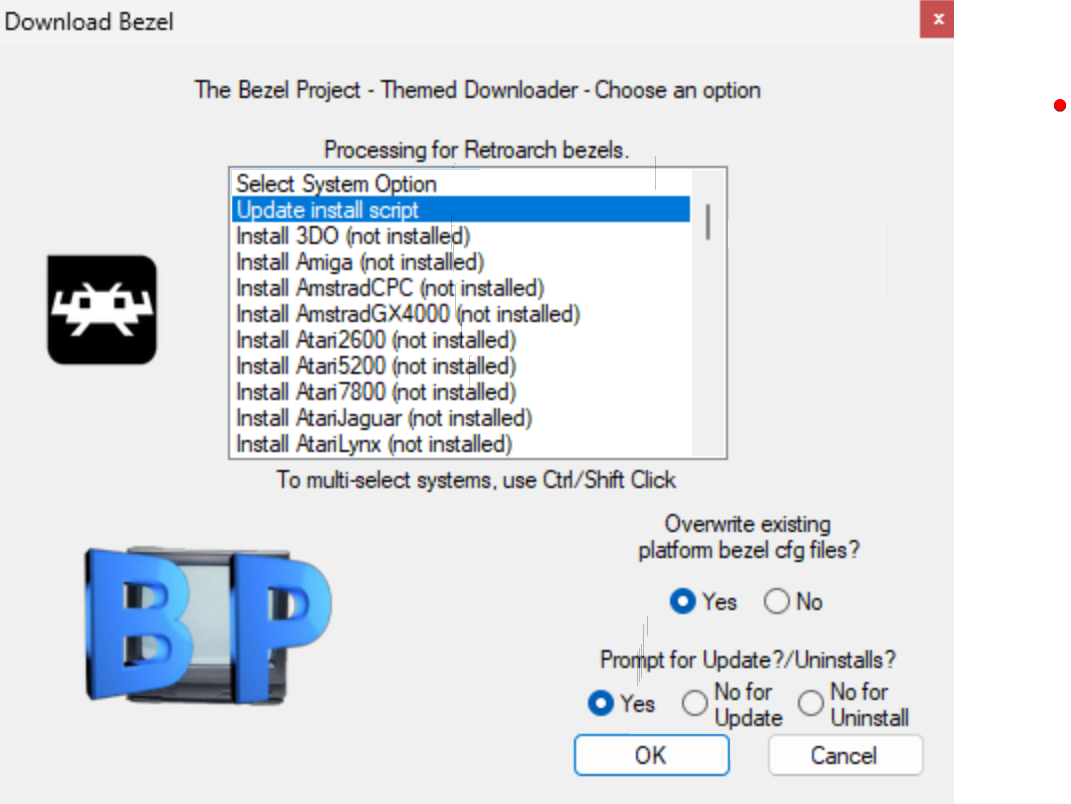
Press OK to update the script.
Next, select the bezel packs you want to install and press OK. This wi. take some time.
The bezels will load when you launch your games.
If a bezel does not load, it’s most likely because the ROM name doesn’t match the bezel configuration filename and the image filename for the bezel. You can verify this by going to C:\games\EmulationStation-DE\Emulators\RetroArch-Win64\overlays\GameBezels\ and looking in the folder for the system you’re using. You’ll find a cfg and png file for each bezel. Ensure your ROM matches those filenames.
Next you’ll set up Steam so you can play PC games from your Steam library.
Install Steam
Install Steam as normal. Log in to your account.
When Steam Friends appears, click the settings cog and disable Steam friends from starting when you launch Steam.
In Settings:
- Interface
- Check Run Steam when my computer starts
- Check
- Library
- Check Low Performance mode
- Check Low Bandwidth Mode.
Install your Steam games locally. When installing, choose to add a Desktop shortcut for your games. Don’t create Start menu shortcuts though.
Set up Steam games in ES-DE
Your Desktop is now full of icons for your games. You’ll move those into the ES-DE folder so ES-DE can display your library there.
Open the File Explorer in Windows.
- Copy
c:\games\ES-DE\ROMs_ALL\steamtoc:\games\ES-DE\ROMs\steam. - Move the icons from your Desktop to
c:\games\ES-DE\ROMs\steam:
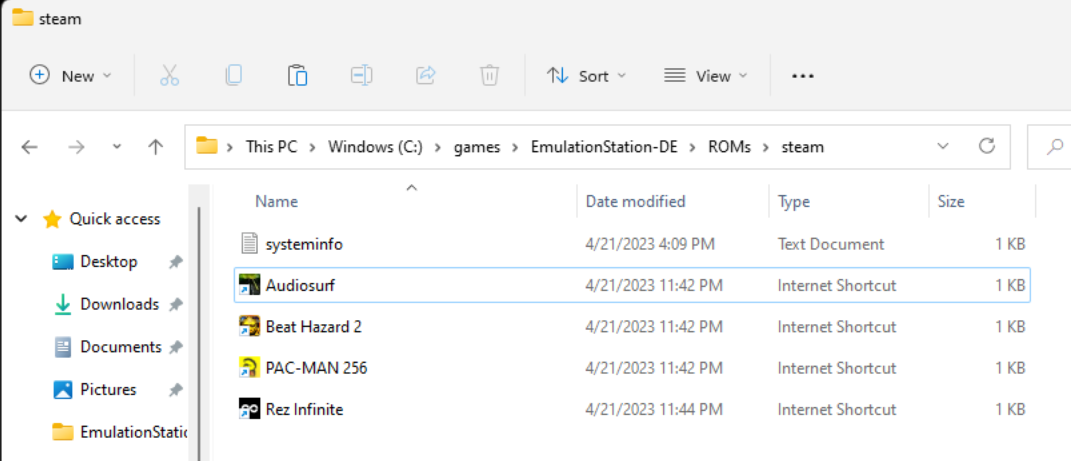
This way ES-DE can find them.
Next you’ll launch ES-DE and set up the default emulators.
Set up emulator defaults
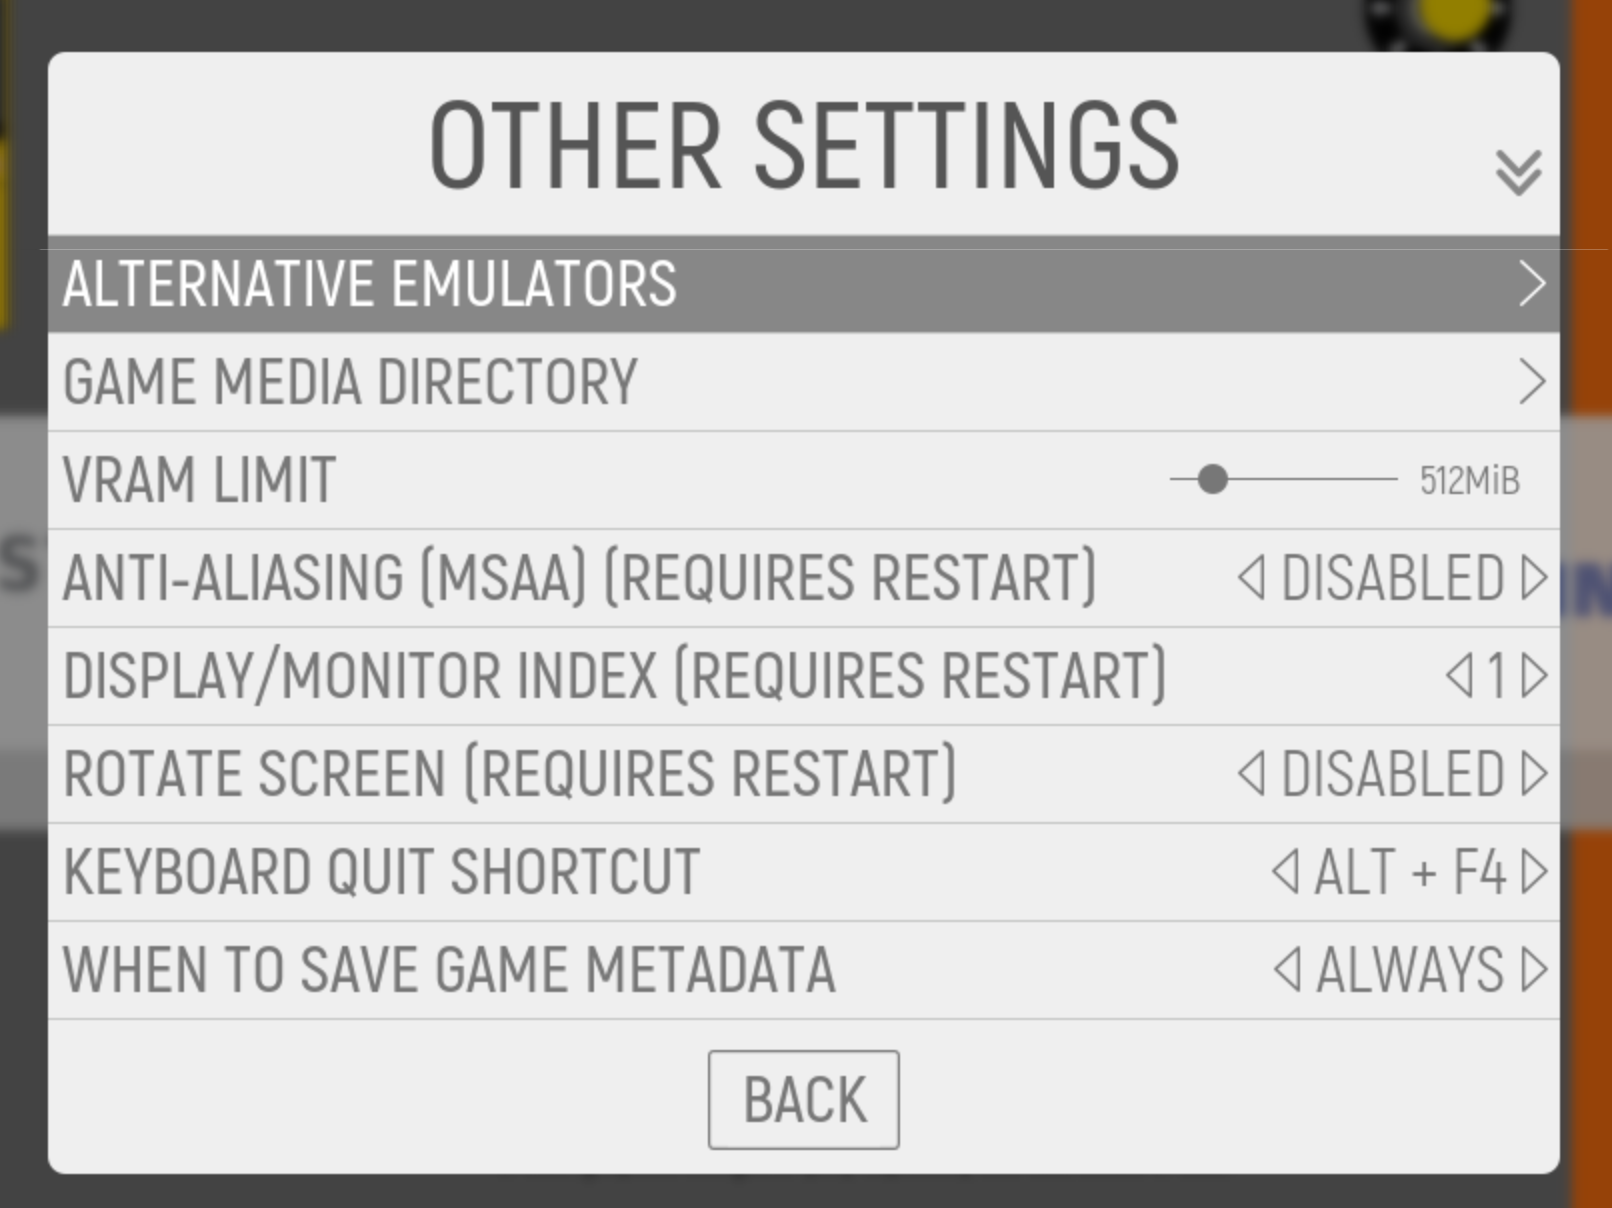
Launch ES-DE. Press the ESC key to bring up the menu and choose Other Settings.
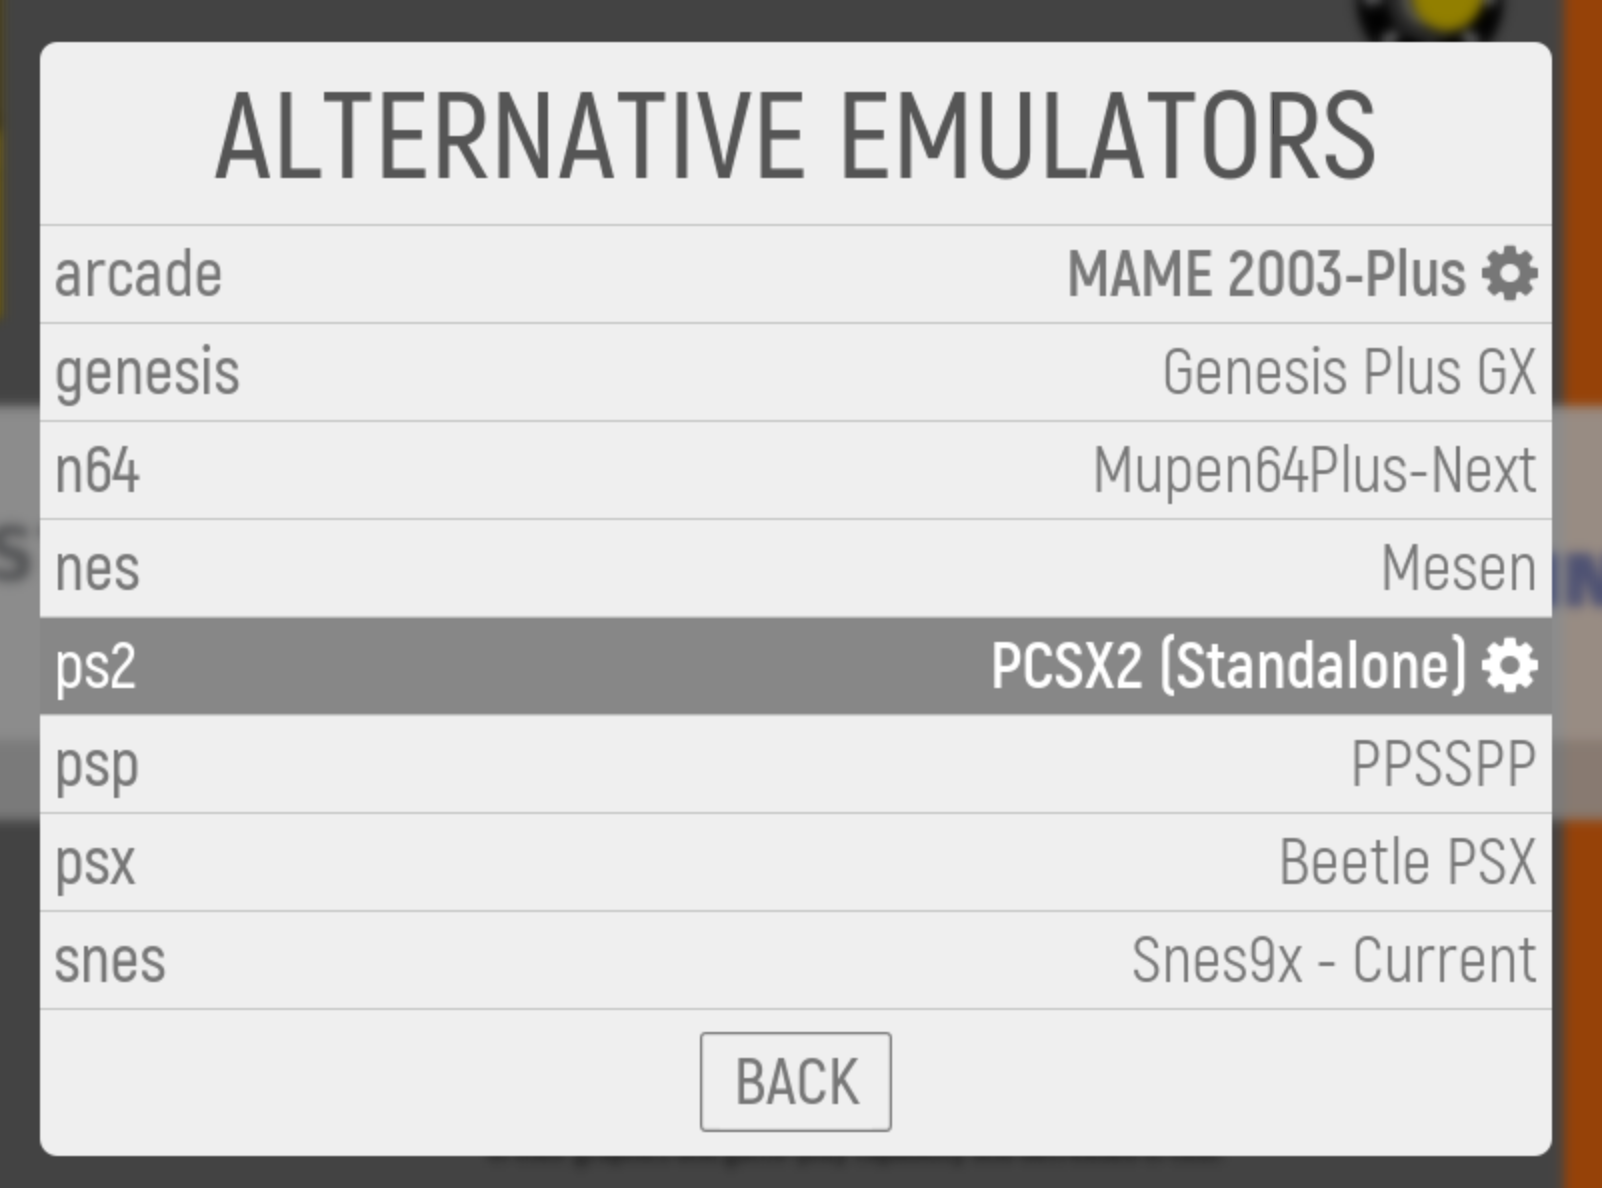
- For Arcade, set the Mame 2003 Plus emulator.
- For PS2, use the PCSX2 [Standalone] emulator.
- For NES, choose either Mesen or Quicknes, depending on what you installed.
- Leave other emulators at the default values.
Next you’ll set up your artwork and download videos for the games.
Download artwork and videos
ES-DE can download box art and images for your games, which it will display as you navigate through your catalog. You can also use these images or videos as an “attract mode” screensaver.
Launch ES-DE. Press the ESC key to bring up the menu and choose Scraper:
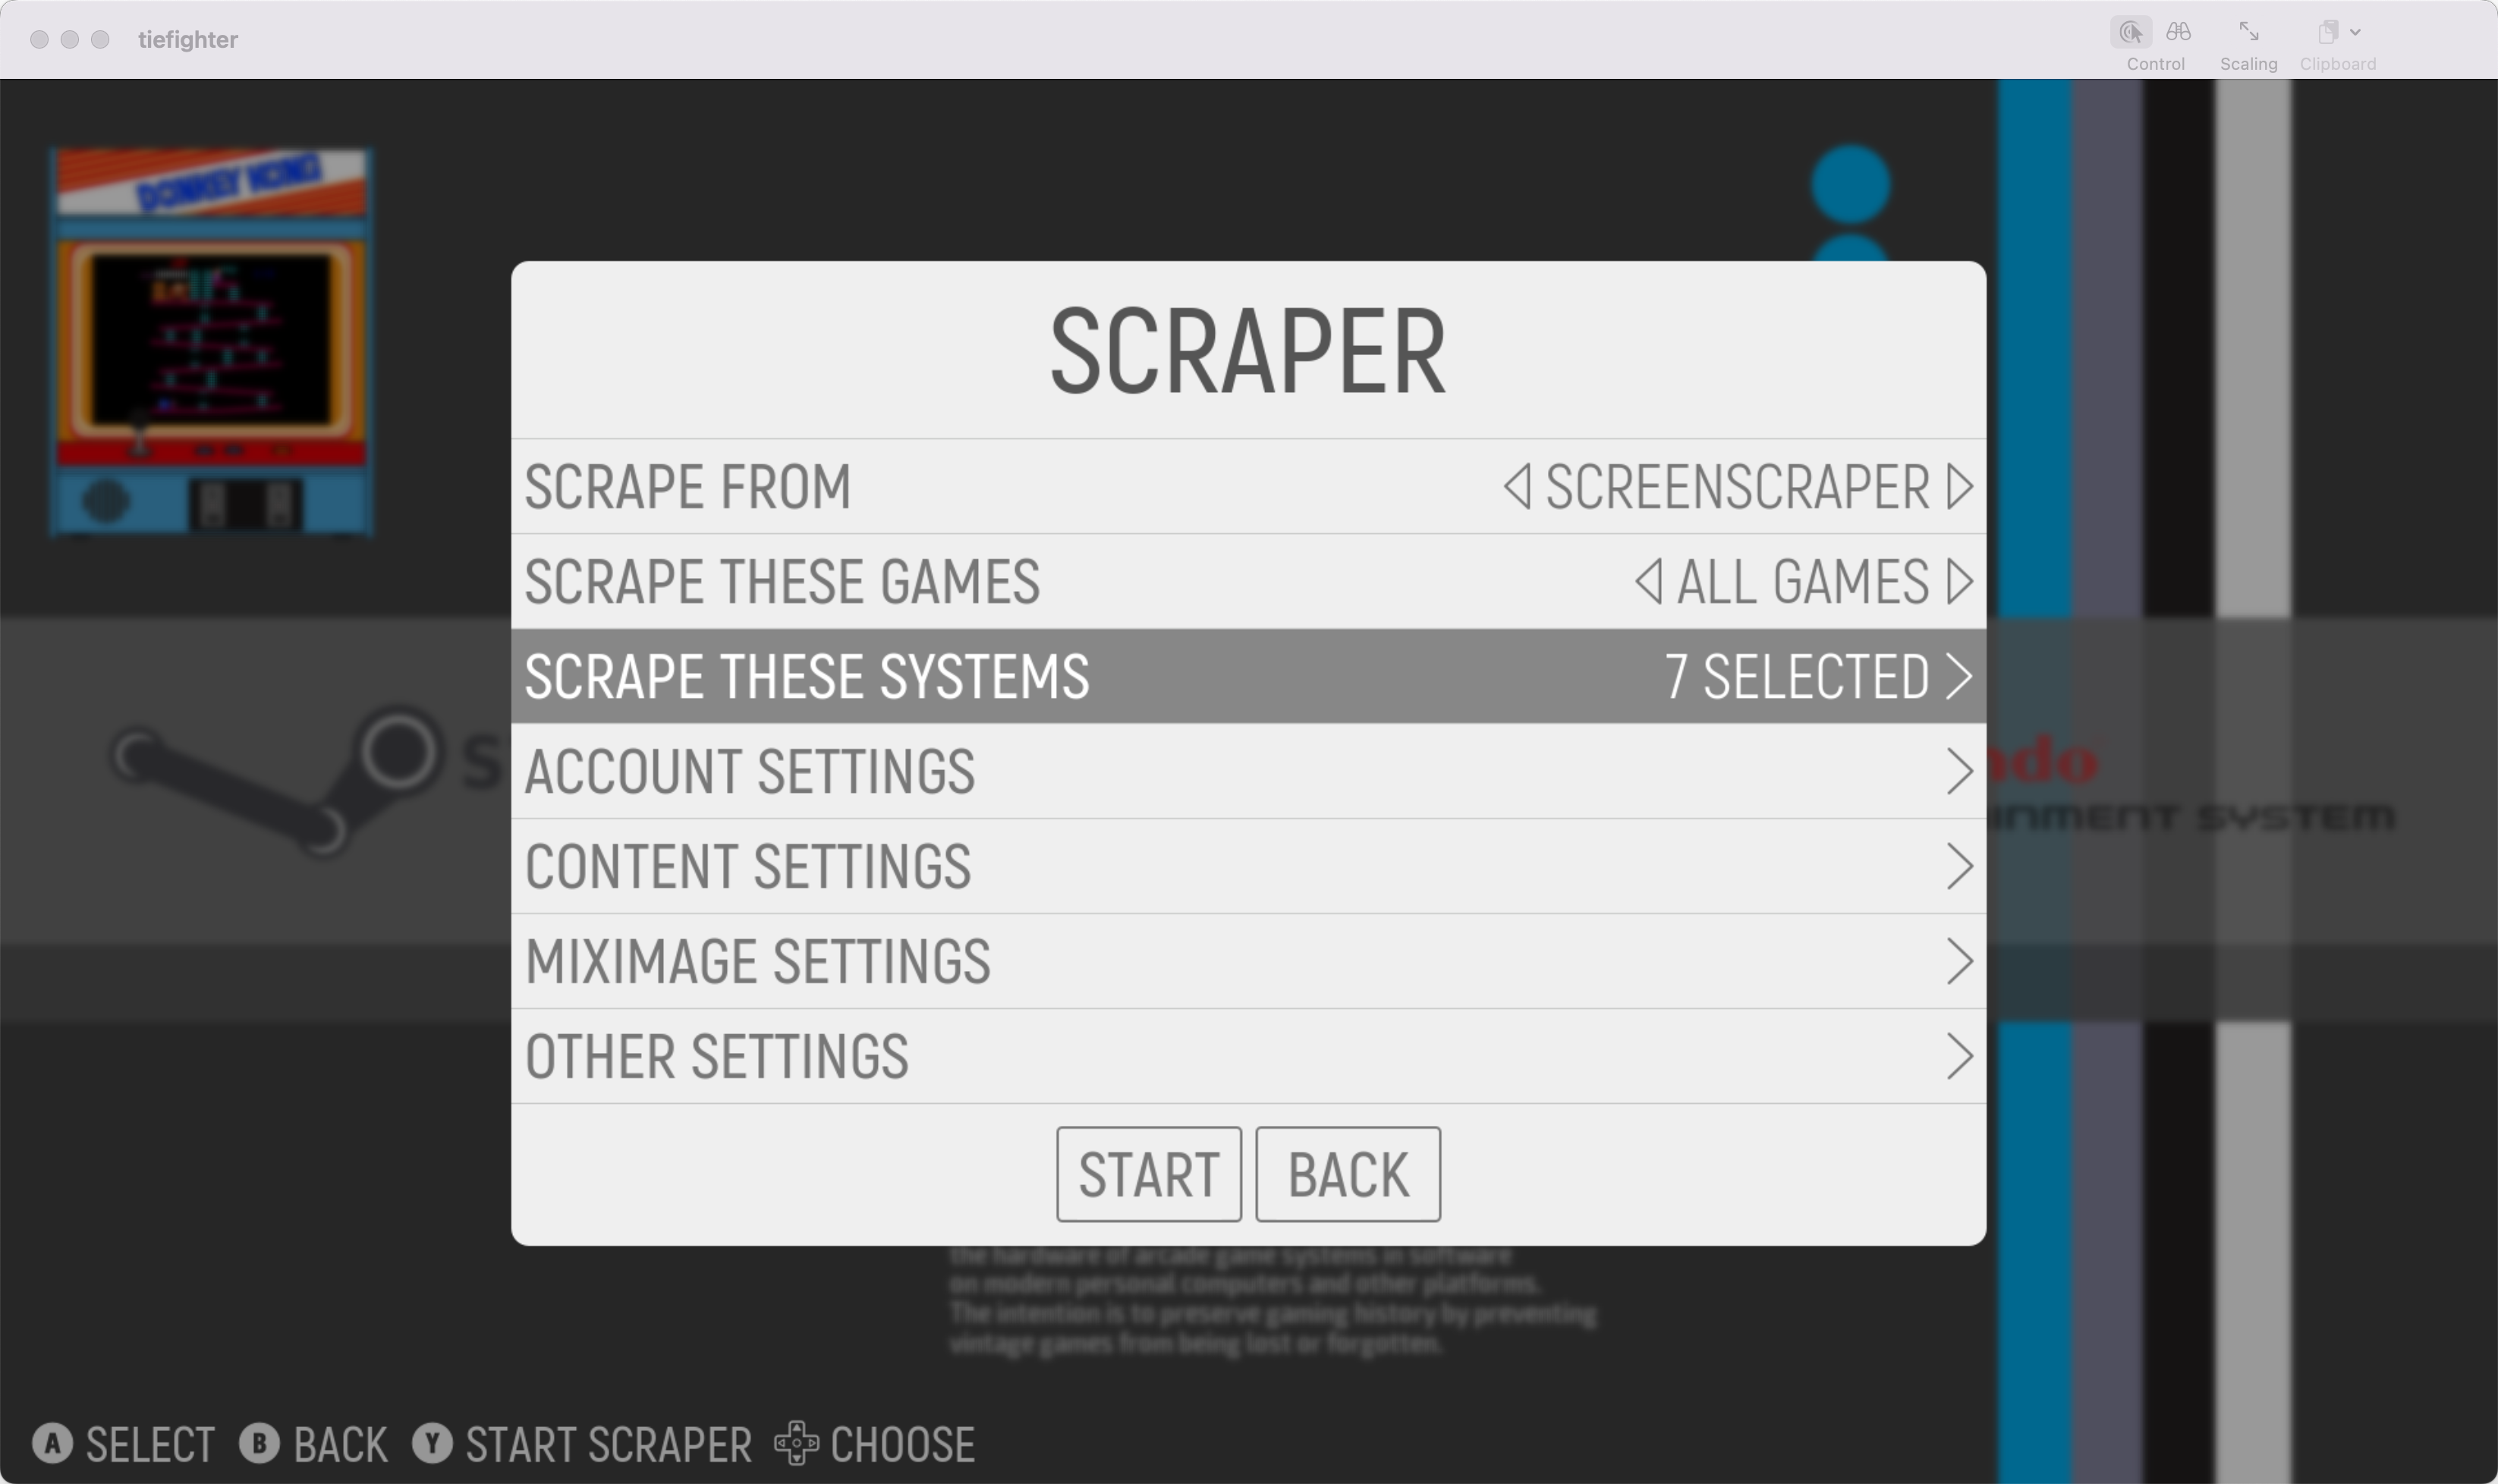
This process will take a long time and may not be 100% accurate. You can correct individual games by pressing the Select button on your controller when selecting a game. You can scrape the individual game and also refine the search criteria for that game.
Next you’ll configure the front-end.
Set up Flex as a front end for your HTPC
You’ll want a front-end optimized for televisions to launch your programs.
Download Flex Launcher
Unzip this to c:\htpc\flex.
Open the c:\htpc\flex\config.ini file in a text editor.
Configure basic settings
At the top of the file, ensure mouse mode is enabled by setting MouseSelect=true:
# Flex Launcher v2.1 sample configuration file
# For documentation of these settings, visit: https://complexlogic.github.io/flex-launcher/configuration
[General]
DefaultMenu=Main
VSync=true
#FPSLimit=
OnLaunch=Blank
ResetOnBack=false
MouseSelect=true
InhibitOSScreensaver=false
#StartupCmd=
#QuitCmd=
Configure a background image:
[Background]
Mode=Image
Color=#000000
Image="c:\pictures\IMG_6171-2.jpg"
#SlideshowDirectory=
#SlideshowImageDuration=30
#SlideshowTransitionTime=3
#ChromaKeyColor=#010101
Overlay=true
OverlayColor=#000000
OverlayOpacity=50%
Configure your icon size so you can see 5 icons on the screen at a time:
[Layout]
MaxButtons=5
IconSize=256
IconSpacing=5%
VCenter=50%
Disable the Esc key so it can’t close the app:
[Hotkeys]
# Esc to quit
# Hotkey1=#1B;:quit
That takes care of the basic configuration. Now set up the menu.
Configure the Menu
Scroll to the bottom of the file to find the menu definition.
Replace what’s there with the following code which defines entries for J.River Media Center, EmulationStation, Chrome, and a System menu.
# Menu configurations
[Main]
Entry1=Media Center;.\assets\icons\kodi.png;"c:\htpc\start.bat"
Entry2=Games;.\assets\icons\retroarch.png;"C:\games\EmulationStation-DE\EmulationStation.exe"
Entry3=Browser;.\assets\icons\plex.png;"C:\Program Files\Google\Chrome\Application\chrome.exe"
Entry4=System;.\assets\icons\system.png;:submenu System
Then define the System and Settings menu so you can quit and access EventGhost, Steam, and the Control Panel:
[System]
Entry1=Back;.\assets\icons\system.png;:back
Entry2=Settings;.\assets\icons\system.png;:submenu Settings
Entry3=Quit;.\assets\icons\system.png;:quit

[Settings]
Entry1=Back;.\assets\icons\system.png;:back
Entry2=Control panel;.\assets\icons\system.png;"C:\Windows\System32\control.exe"
Entry3=EventGhost;.\assets\icons\system.png;"C:\Program Files (x86)\EventGhost\EventGhost.exe"
Entry4=Steam;.\assets\icons\steam.png;"C:\Program Files (x86)\Steam\steam.exe" steam://open/bigpicture
Save the file.
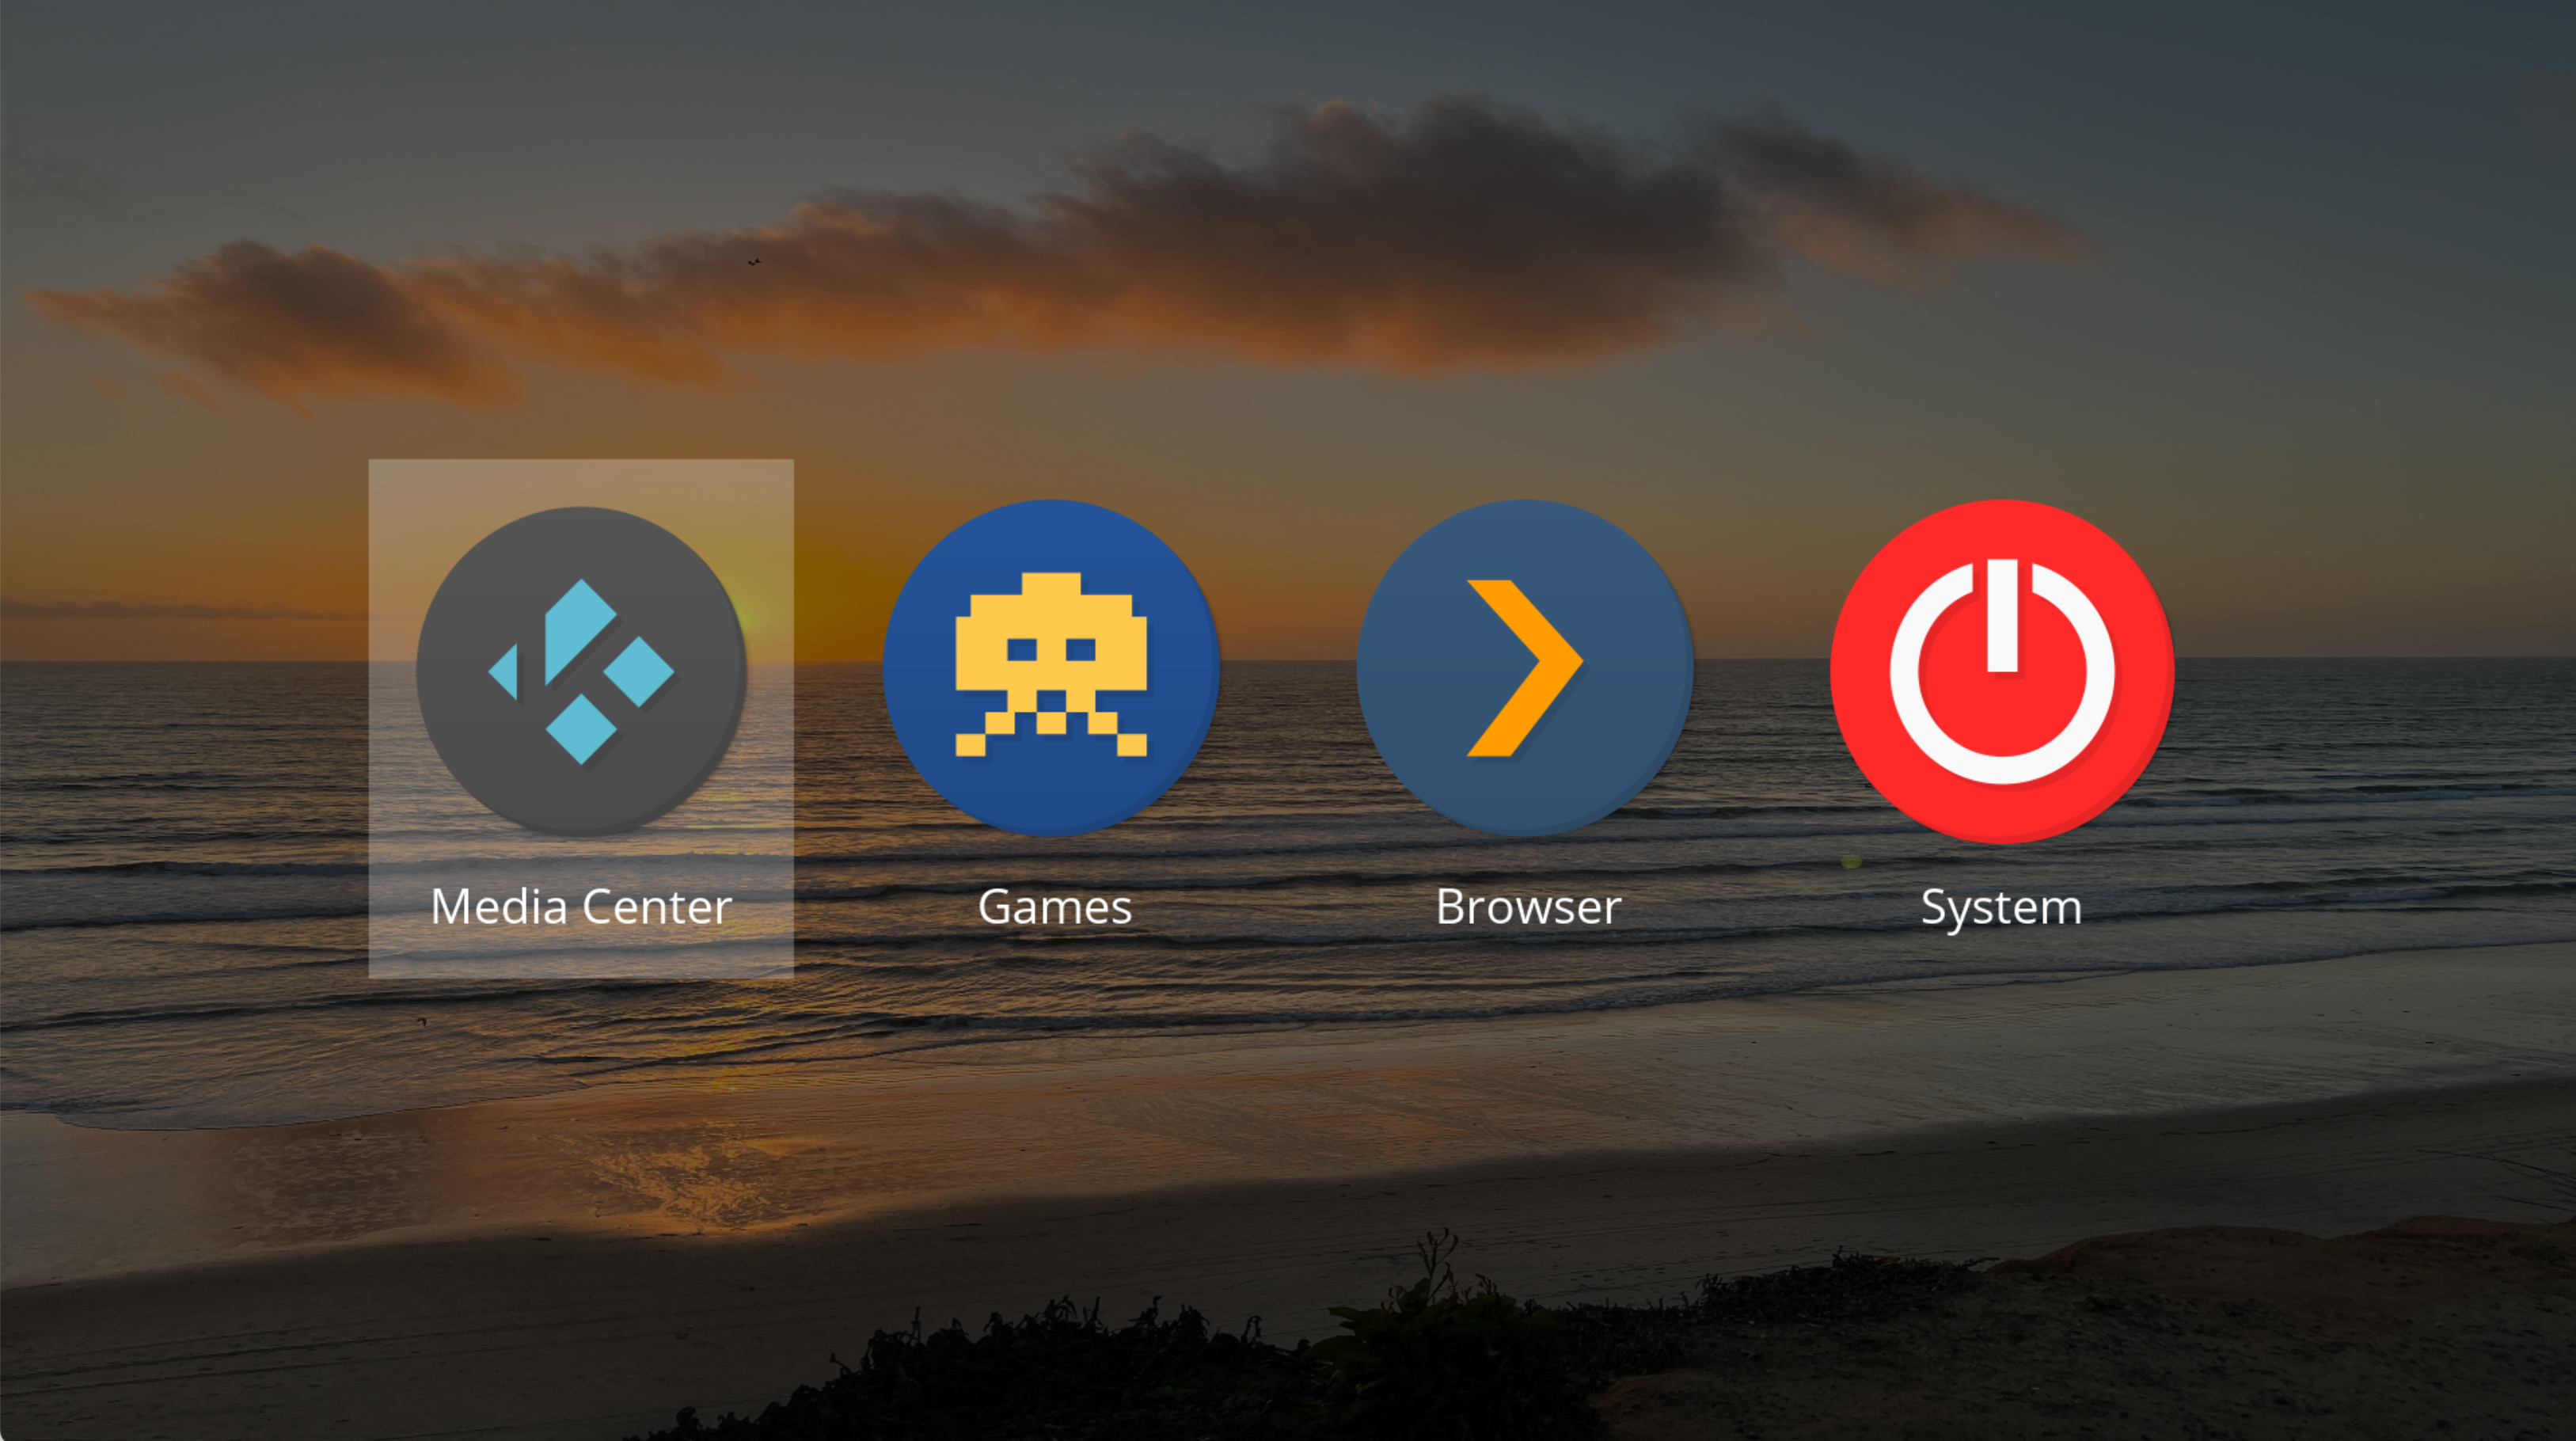
Launch Flex and you’ll see this interface:
Next you’ll configure the system so you can control it with a remote control.
Use EventGhost to control everything
EventGhost is software that interprets signals from your remote receiver and converts them into keyboard shortcuts or mouse movement.
Download the latest EventGhost:
Install the software.
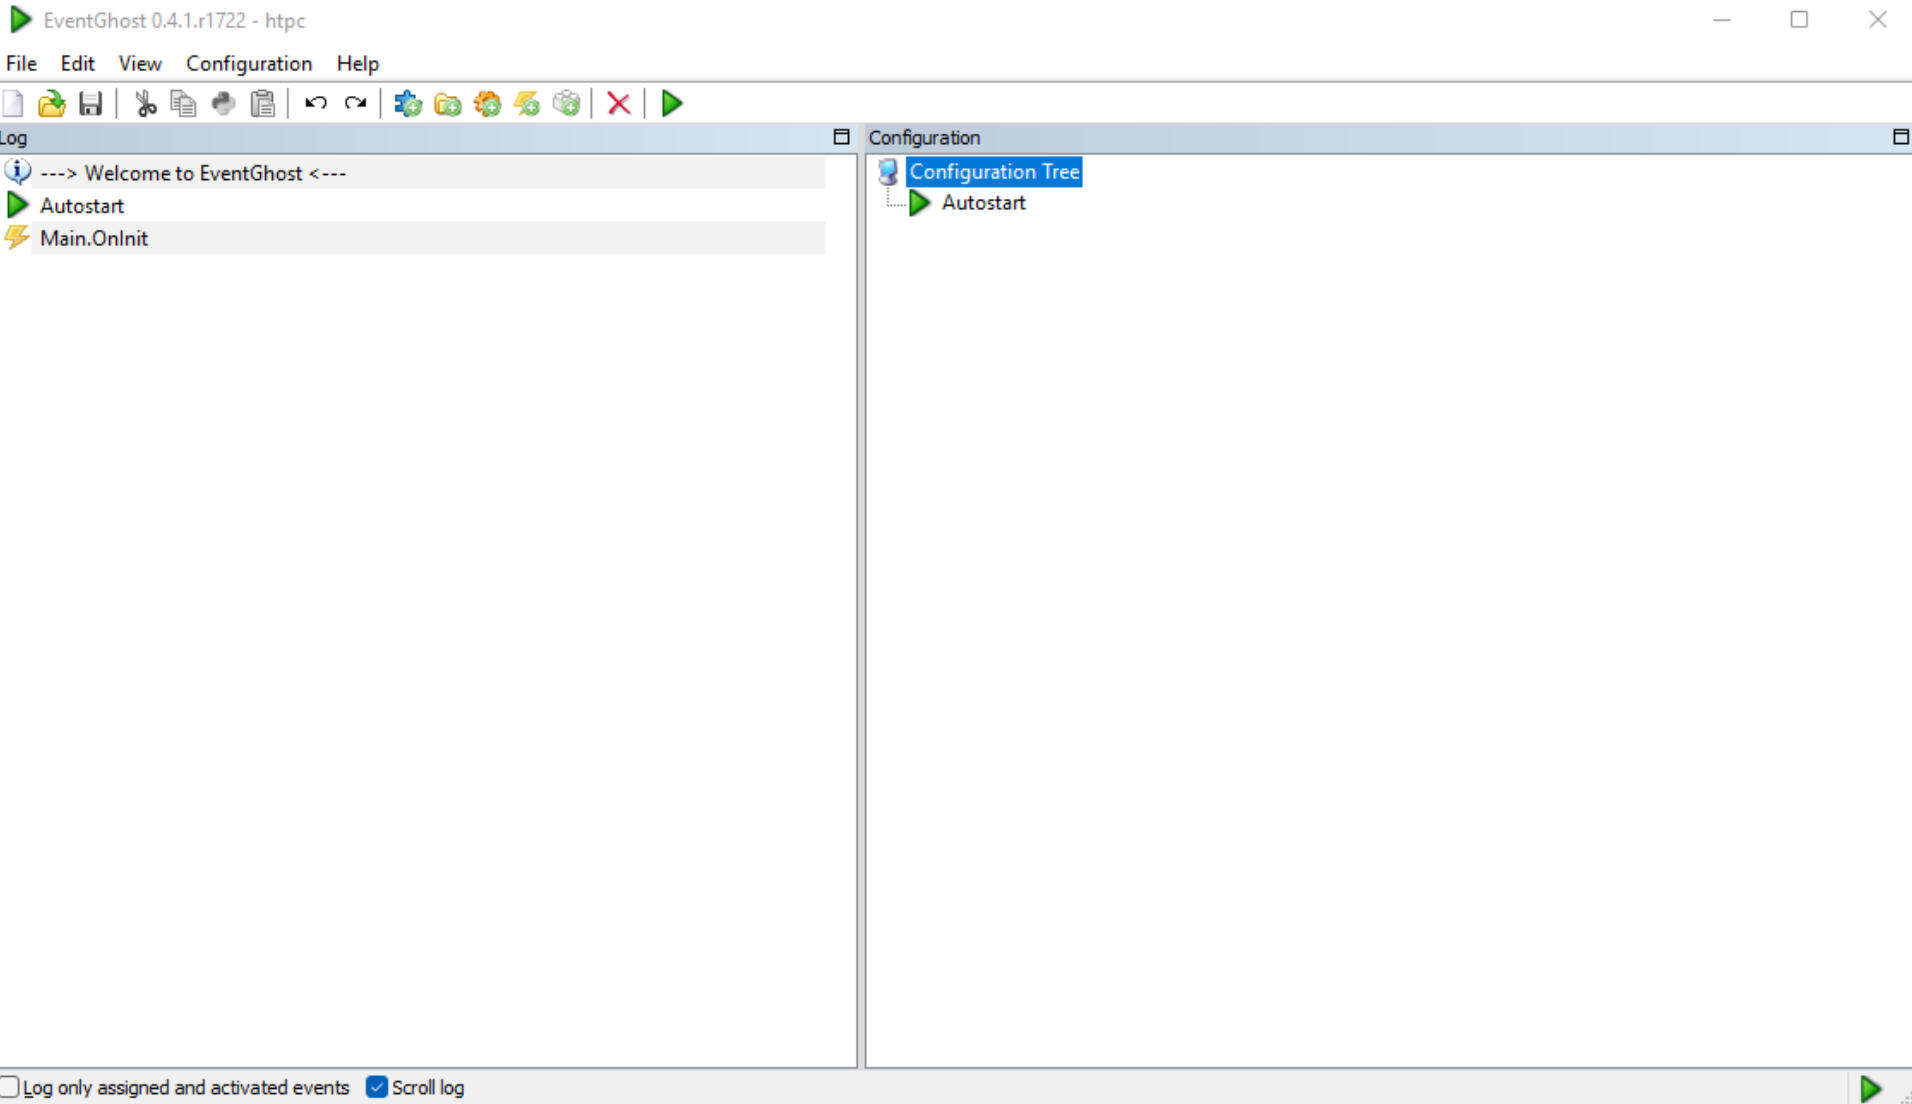
Launch the software. Create a new configuration file. Your UI should be blank:
Go to File and choose Options.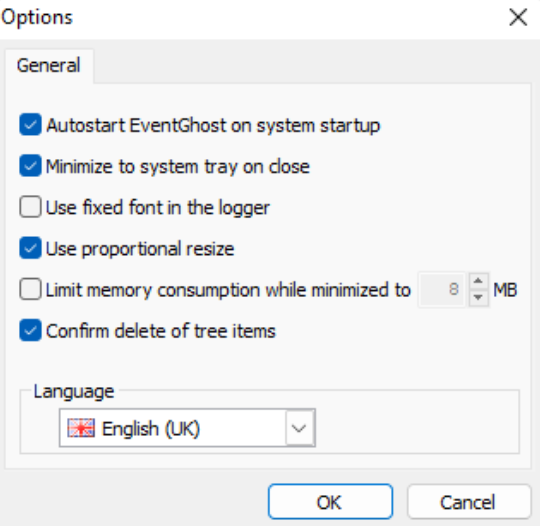
Ensure EventGhost autostarts and that it minimizes to the tray when you close the window.
Install the driver for your remote
EventGhost ships with drivers for a handful of remote devices.
Select Configure and Add Plugin.
Choose your remote plugin.
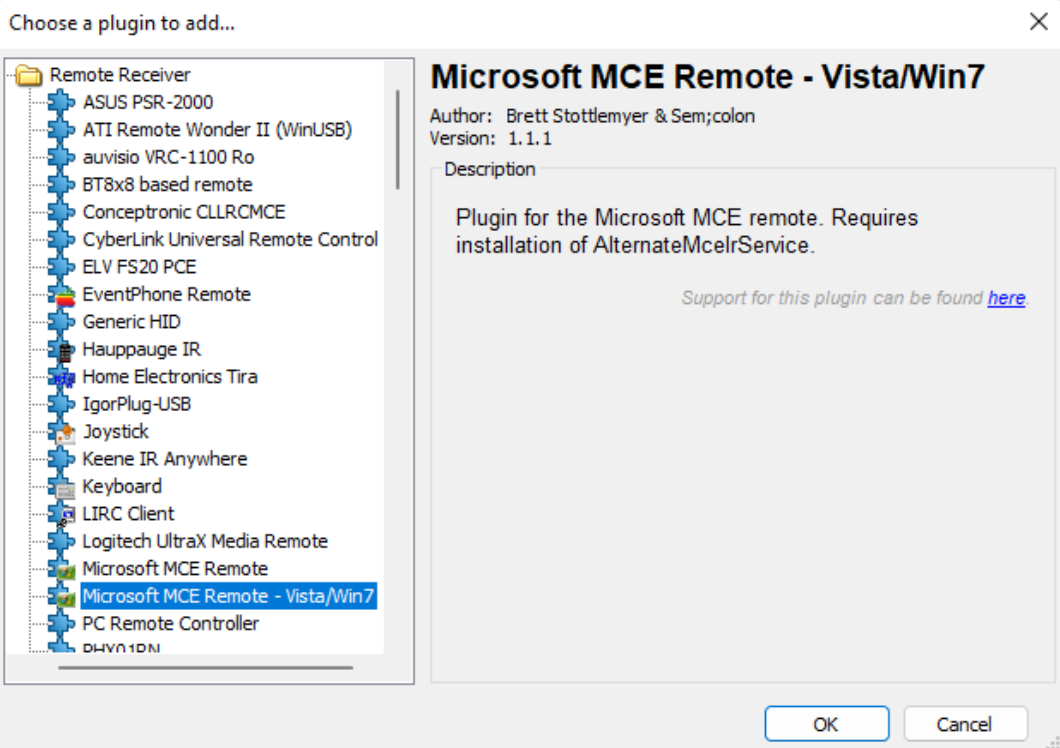
- Install the Windows Vista version of the MCE remote if you’re using the hP remote.
- Install the USB-UIRT driver if you’re using that receiver.
If you install the MCE Vista remote, you will need to install the service.
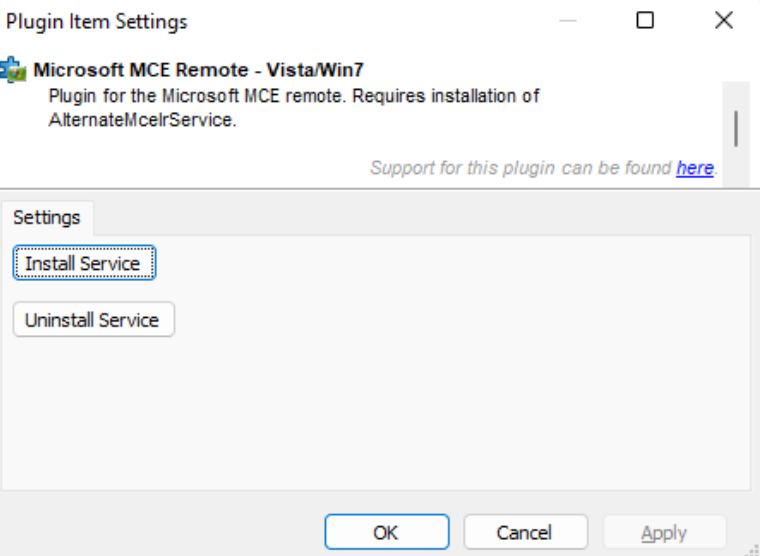
Once it’s installed, save the EventGhost configuration and Reboot the machine.. The service will not work until you reboot.
Once rebooted, test your remote.
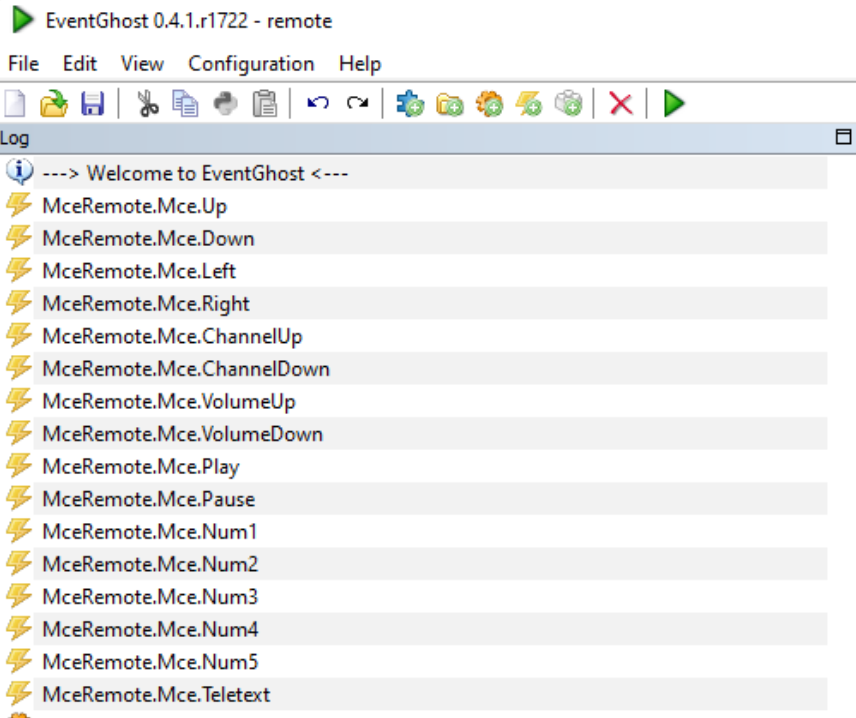
Press remote buttons to capture their events
Press the various buttons on your remote. EventGhost will display them in the log. You’ll be able to drag these events into EventGhost actions.
Add an On Screen Menu
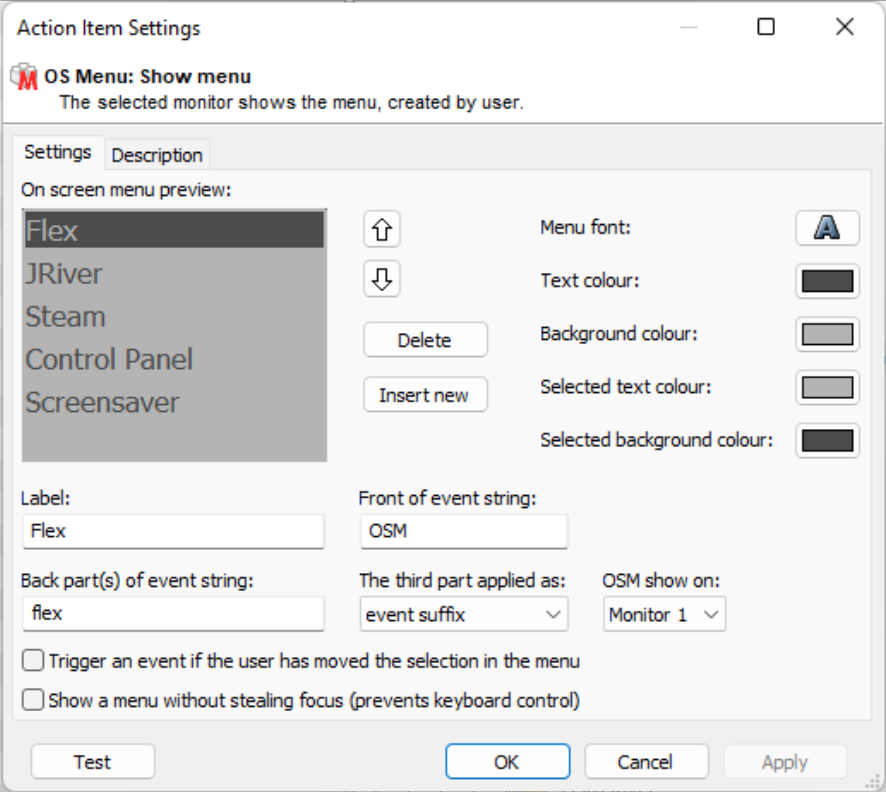
Add the OSM plugin. It’ll ask to add defaults. Add them. You’ll delete many of the defaults later, but it’ll save some time.
Click on the OS Menu: Show menu option. Create menu items for some programs:
Create Default Remote navigation
- Add a new Folder to the sidebar called Programs.
- Add a new folder within that called Default
- Within that folder, add the folder Keyboard Navigation.
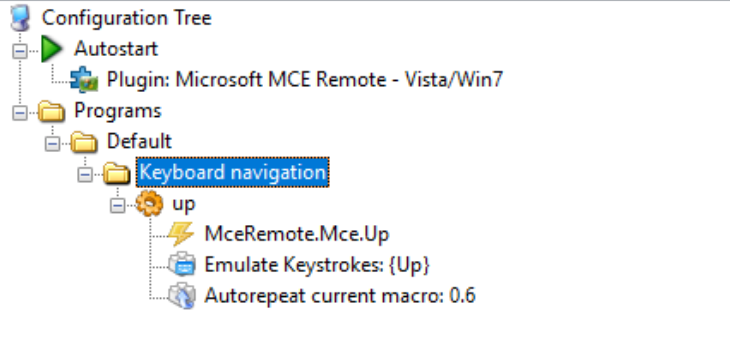
- Within Keyboard Navigation, add a new Macro called Up.
- Drag the remote event for the UP keypress from the log into the macro.
Then, within the macro, add a new Emulate Keystrokes action
- Right click the up macro and choose Add Action
- Go to Window and choose Emulate Keystrokes and add the action.
- In the box that appears, instead of typing in a phrase, use the pick list to locate Up and press Insert. It will add
{Up}to the text box. - Click Ok
Within the macro, add an autorepeat action:
- Right click the up macro and choose Add Action
- Go to EventGhost and choose Autorepeat current macro and add the action.
- Choose the default repeat settings.
The end result looks like the following:
Add in the rest of the directions.
- Add the Ok button for
Enter. - Use the Back button for
Escape - Use the
Teletypebutton for theALT+F4combo
To speed up the process, copy and paste the existing macro you made and then edit the name and the keystroke.
When you’re done, the default config looks like this:
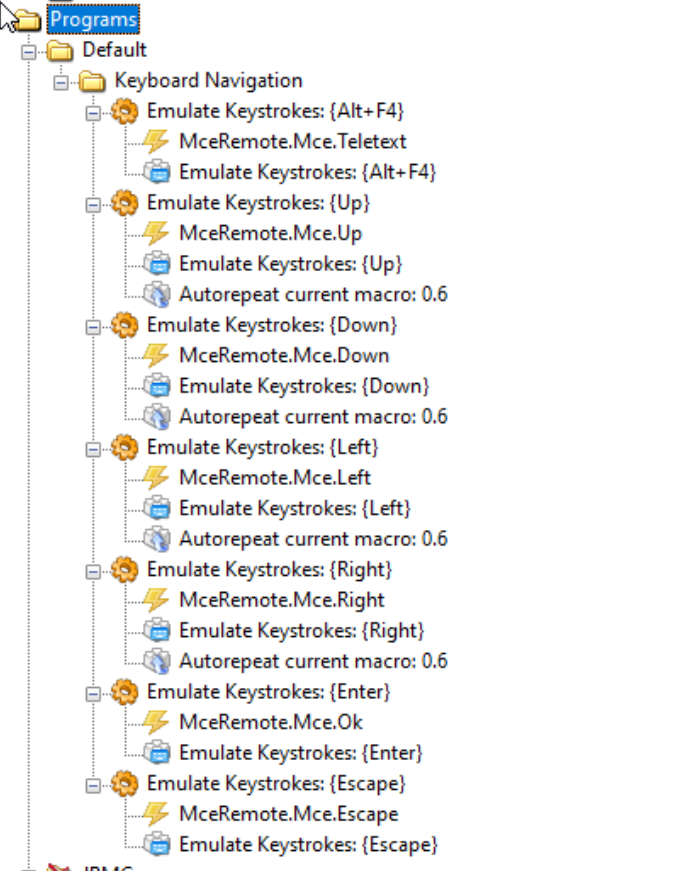
Save the file.
Test out the remote. You should be able to use the arrows to navigate and the log shows the actions.
Set up Task Create/Switch plugin
EventGhost can respond to system tasks, such as program activations and deactivations. This is helpful for focusing apps when programs open or close, or when a program gets focus.
Under Autostart, add the plugin Task Create/Switch Events.

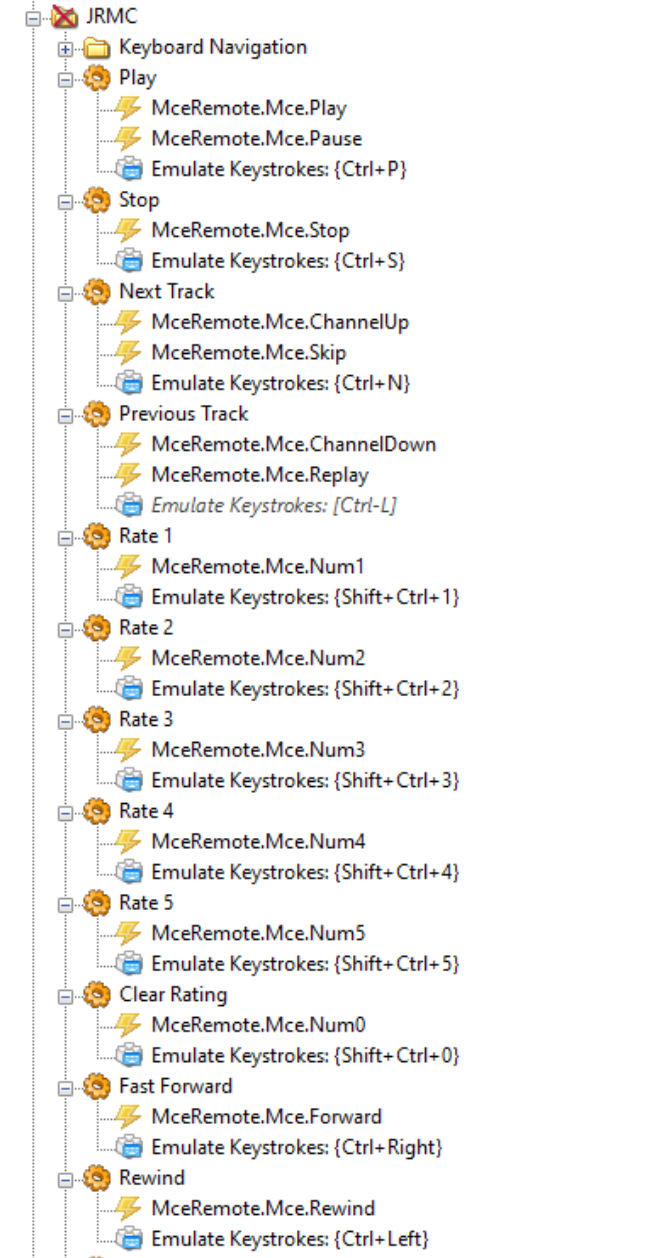
Control JRiver Media Center
JRiver Media Center has additional keyboard bindings you’ll want to use with the remote, such as Play/Pause, Skip Tracks, and toggling between views. To configure it, you’ll copy the Default scheme you created and modify it.
Copy the Default folder and paste it, and rename the copy to JRMC. Then add additional commands for play, fast forward, rewind, and other keystrokes.
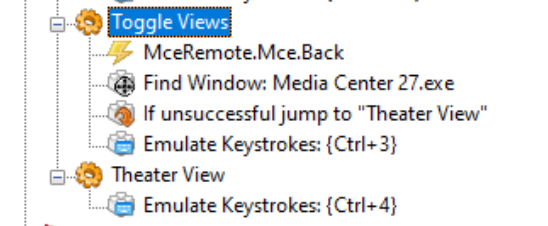
Thene add a configuration that toggles Theater View. Detect whether Theater View is running.
- Create a Toggle Views macro and a Theater Vieew macro.
- In Theater View, add Emulate keystrokes: Ctrl+4
- In Toggle Views, assign the Back button, and then use the Find Window action.
Open Theater View. Then use Alt+Tab to swap back to EventGhost. Make sure Media Center is hte program and the Window name is Theater View GL as shown in the following image:
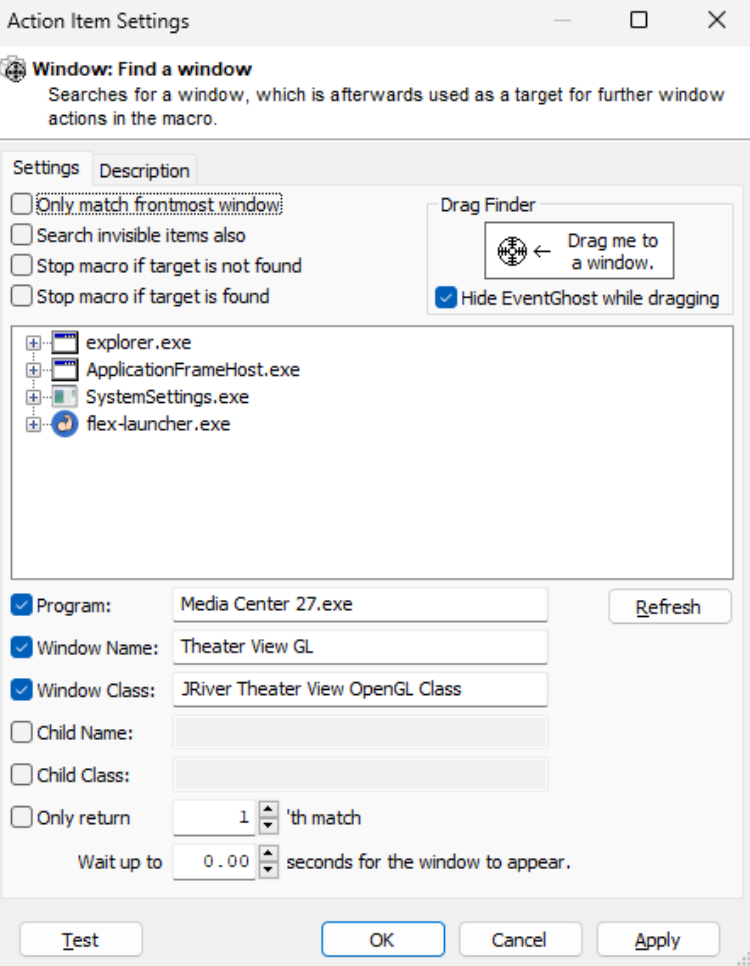
Then add an “if Unsuccessful” option to jump to the Theater View macro you made. Then add Emulate Keystrokes: Ctrl+3.
If Theater View is running, the button will turn it off. If it’s off, it’ll turn it on.
Now set up the program launch.
Launching Media Center and handling events
For some reason Media Center doesn’t always return control back to the launching program. Use a bat file for this instead. That way the bat file is the program the launcher is observing.
In the htpc folder, add the file start.bat:
@echo off
"C:\Program Files\J River\Media Center 27\Media Center 27.exe"
Now back in EventGhost:
- Create a new folder called Program Launchers.
- Within that folder create a JRMC folder.
- Within that, add a Start Program macro. Have it call the
c:\htpc\start.batcommand. - Add a macro called Deactivate JRMC and have it look for the Task Deactivated for MC and enable the Default command configuration.
- Add a macro called Activate and enable exclusive the JRMC config.

Next you’ll configure the screensaver.
Set up screensaver events
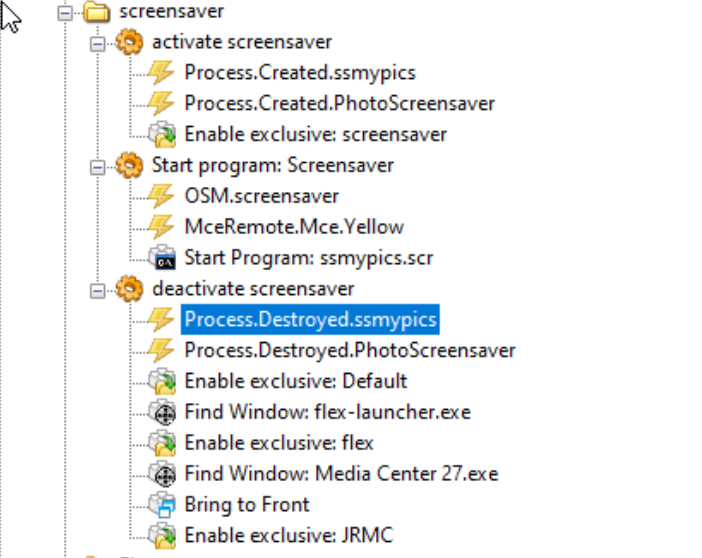
Make EventGhost work with Flex.
Flex launcher doesn’t handle the Enter keypress, so we’ll need a new mode for it, so you’ll follow the same approach you used for J River Media Center: you’ll copy the Default group over and modify it.
First, create a Flex program
Then activate the flex commands exclusively when Flex is launched and closed:
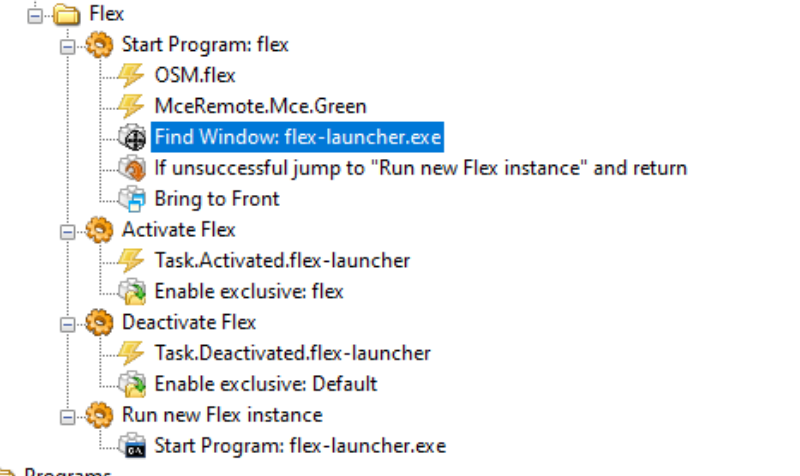
Launching Flex and handling events
Flex doesn’t prevent itself from launching multiple times. If you launch it from the on screen menu, it’ll load a new instance. This can cause issues. Using EventGhost, you’ll detect Flex’s state and focus it if you find it, or you’ll launch a new instance.
Create the Flex program launcher group.
- Create the Run New Flex instance macro
- Add Start Program action and point it to Flex.
- Create the Start Program: flex macro
- Use the OSM.flex event
- Use the green button event
- Find the Flex window using the Find Window action.
- Ensure that the macro DOES NOT STOP if the action fails!
- Add a Jump action.
- If the previous event is unsuccessful, jump to Run new Flex instance and return
- Bring the window to front.
- Add Activate Flex macro
- Add the Task.Activated.flex-launcher event
- Add Enable Exclusive: flex.
- Add Deactivate Flex macro
- Add the Task.Deactivated.flex-launcher event
- add Enable Exclusive: Default
TODO: Launch flex on startup
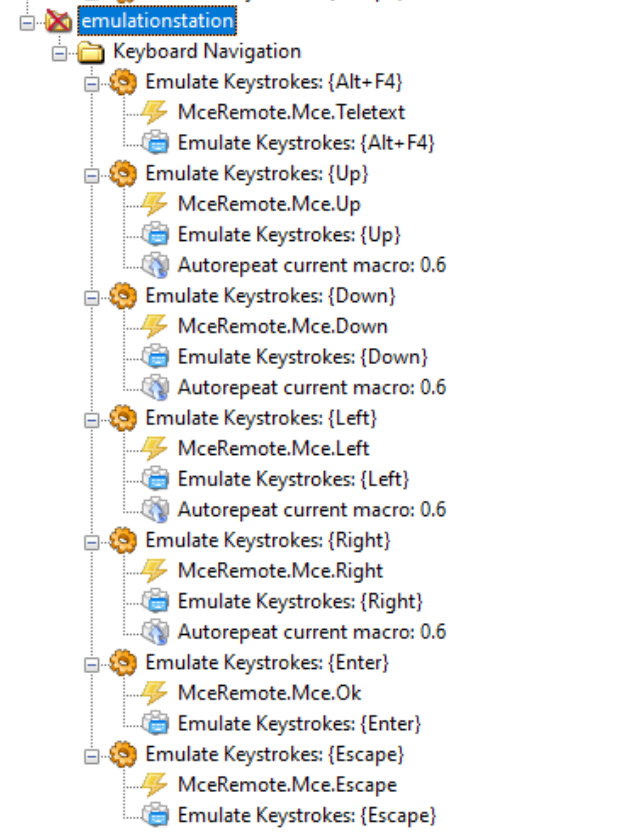
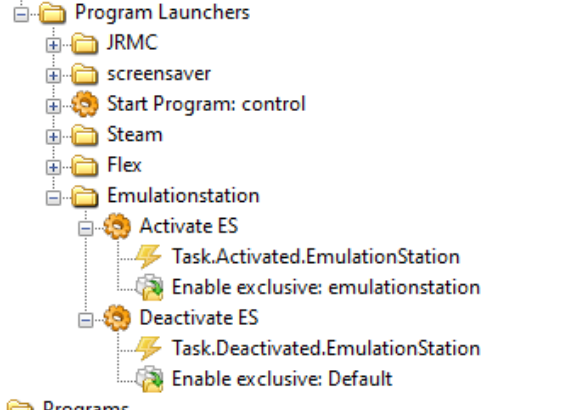
Control ES-DE
Like Flex, ES-DE needs the alternative keypress modes for a couple features.
Copy the components for Flex. Rename all of the copies to reference EventGhost.
Copy the commands and change the Escape keypress to also use the alternative method:
Appendix
Flex config
File: config.ini
# Flex Launcher v2.1 sample configuration file
# For documentation of these settings, visit: https://complexlogic.github.io/flex-launcher/configuration
[General]
DefaultMenu=Main
VSync=true
#FPSLimit=
OnLaunch=Blank
ResetOnBack=false
MouseSelect=true
InhibitOSScreensaver=false
#StartupCmd=
#QuitCmd=

[Background]
Mode=Image
Color=#000000
Image="c:\pictures\IMG_6171-2.jpg"
#SlideshowDirectory=
#SlideshowImageDuration=30
#SlideshowTransitionTime=3
#ChromaKeyColor=#010101
Overlay=true
OverlayColor=#000000
OverlayOpacity=50%

[Layout]
MaxButtons=5
IconSize=256
IconSpacing=5%
VCenter=50%

[Titles]
Enabled=true
Font=.\assets\fonts\OpenSans-Regular.ttf
FontSize=36
Color=#FFFFFF
Opacity=100%
Shadows=false
ShadowColor=#000000
OversizeMode=Shrink
Padding=20

[Highlight]
Enabled=true
FillColor=#FFFFFF
FillOpacity=25%
OutlineSize=0
OutlineColor=#0000FF
OutlineOpacity=100%
CornerRadius=0
VPadding=30
HPadding=30

[Scroll Indicators]
Enabled=true
FillColor=#FFFFFF
OutlineSize=0
OutlineColor=#000000
Opacity=100%

[Clock]
Enabled=false
ShowDate=false
Alignment=Left
Font=.\assets\fonts\SourceSansPro-Regular.ttf
FontSize=50
FontColor=#FFFFFF
Shadows=false
ShadowColor=#000000
Margin=5%
Opacity=100%
TimeFormat=Auto
DateFormat=Auto
IncludeWeekday=true

[Screensaver]
Enabled=false
IdleTime=300
Intensity=70%
PauseSlideshow=true

[Hotkeys]
# Esc to quit
# Hotkey1=#1B;:quit

[Gamepad]
Enabled=false
DeviceIndex=-1
#ControllerMappingsFile=
LStickX-=:left
LStickX+=:right
#LStickY-=
#LStickY+=
#RStickX-=
#RStickX+=
#RStickY-=
#RStickY+=
#LTrigger=
#RTrigger=
ButtonA=:select
ButtonB=:back
#ButtonX=
#ButtonY=
#ButtonBack=
#ButtonGuide=
#ButtonStart=
#ButtonLeftStick=
#ButtonRightStick=
#ButtonLeftShoulder=
#ButtonRightShoulder=
#ButtonDPadUp=
#ButtonDPadDown=
ButtonDPadLeft=:left
ButtonDPadRight=:right

# Menu configurations
[Main]
Entry1=Media Center;.\assets\icons\kodi.png;"c:\htpc\start.bat"
Entry2=Games;.\assets\icons\retroarch.png;"C:\games\ES-DE\ES-DE.exe"
Entry3=Browser;.\assets\icons\plex.png;"C:\Program Files\Google\Chrome\Application\chrome.exe"
Entry4=System;.\assets\icons\system.png;:submenu System

[System]
Entry1=Back;.\assets\icons\system.png;:back
Entry2=Settings;.\assets\icons\system.png;:submenu Settings
Entry3=Quit;.\assets\icons\system.png;:quit

[Settings]
Entry1=Back;.\assets\icons\system.png;:back
Entry2=Control panel;.\assets\icons\system.png;"C:\Windows\System32\control.exe"
Entry3=EventGhost;.\assets\icons\system.png;"C:\Program Files (x86)\EventGhost\EventGhost.exe"
Entry4=Steam;.\assets\icons\steam.png;"C:\Program Files (x86)\Steam\steam.exe" steam://open/bigpicture
Thanks for reading
I don't have comments enabled on this site, but I'd love to talk with you about this article on BlueSky, Mastodon, Twitter, or LinkedIn. Follow me there and say hi.